 maven摘录
# 1 快速入门
# 一、什么是Maven?
Maven 是一个项目管理和整合工具。Maven 为开发者提供了一套完整的构建生命周期框架。开发团队几乎不用花多少时间就能够自动完成工程的基础构建配置,因为 Maven 使用了一个标准的目录结构和一个默认的构建生命周期。
在有多个开发团队环境的情况下,Maven 能够在很短的时间内使得每项工作都按照标准进行。因为大部分的工程配置操作都非常简单并且可复用,在创建报告、检查、构建和测试自动配置时,Maven 可以让开发者的工作变得更简单。
Maven 能够帮助开发者完成以下工作:
- 构建
- 文档生成
- 报告
- 依赖
- SCMs
- 发布
- 分发
- 邮件列表
总的来说,Maven 简化了工程的构建过程,并对其标准化。它无缝衔接了编译、发布、文档生成、团队合作和其他任务。Maven 提高了重用性,负责了大部分构建相关的任务。
# 二、如何安装Maven?
# 1.系统要求
| 项目 | 要求 |
|---|---|
| JDK | Maven 3.3 要求 JDK 1.7 或以上 Maven 3.2 要求 JDK 1.6 或以上 Maven 3.0/3.1 要求 JDK 1.5 或以上 |
| 内存 | 没有最低要求 |
| 磁盘 | Maven 自身安装需要大约 10 MB 空间。除此之外,额外的磁盘空间将用于你的本地 Maven 仓库。你本地仓库的大小取决于使用情况,但预期至少 500 MB |
| 操作系统 | 没有最低要求 |
# 2.安装步骤
# 2.1.JDK安装
# JDK下载
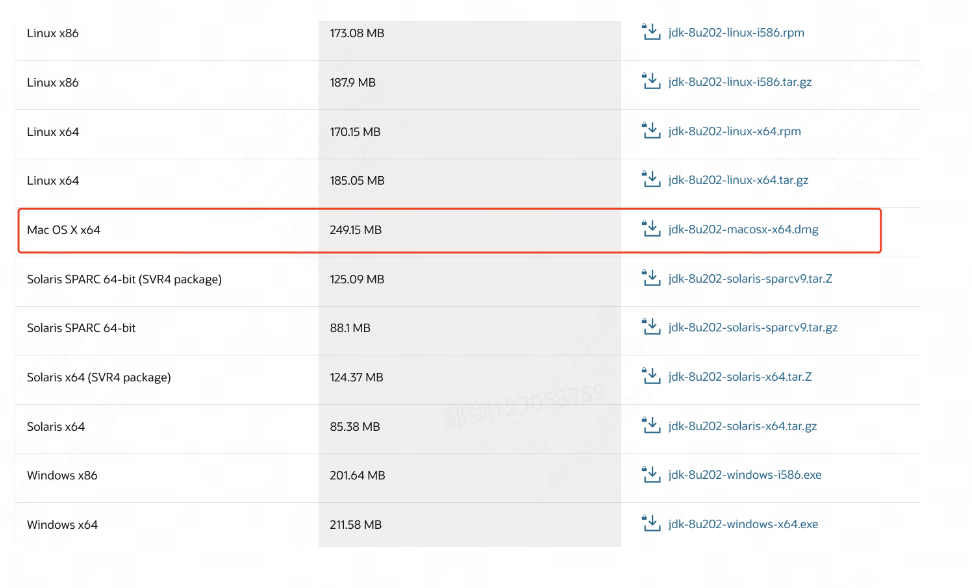
推荐在oracle官网下载JDK:https://www.oracle.com/java/technologies/javase/javase8-archive-downloads.html
# JDK安装
在MacOS环境下可以直接通过dmg程序进行安装,安装程序会自动配置环境,无需手动配置。
# 校验安装
可以在terminal中使用以下命令检查JDK是否安装成功。
java -version
如出现以下输出,代表JDK安装正常。
java version "1.8.0_291"
Java(TM) SE Runtime Environment (build 1.8.0_291-b10)
Java HotSpot(TM) 64-Bit Server VM (build 25.291-b10, mixed mode)
2
3
# 2.2.Maven安装
# Maven下载
从以下网址下载 Maven 3.8.1:http://maven.Apache.org/download.html (opens new window)

# Maven安装
1.解压文件到你想要的位置来安装 Maven 3.8.1,你会得到 apache-maven-3.8.1 子目录。
2.添加 M2_HOME、M2、MAVEN_OPTS 到环境变量中。
Mac环境下可以使用以下任意一种方法添加环境变量
| 名称 | 步骤1 | 步骤2 | 步骤3 |
|---|---|---|---|
| 修改全局环境变量 | 在terminal输入:(可能需要使用sudo命令)sudo vi /etc/bashrc | 在文件的末尾追加:export M2_HOME=改成你解压到的地址/apache-maven-3.8.4 export M2=$M2_HOME/bin export MAVEN_OPTS=-Xms256m -Xmx512m export PATH=$M2:$PATH | 让修改的文件生效source /etc/bashrc |
| 修改当前用户环境变量 | 在terminal输入:vi ~/.bash_rc | 让修改的文件生效source ~/.bash_rc |
# 校验安装
在terminal中输入
mvn --version
展示内容为如下所示,说明安装成功
Apache Maven 3.8.4
Maven home: 你解压到的地址/apache-maven-3.8.4
Java version: 1.8.0_291, vendor: Oracle Corporation, runtime: /Library/Java/JavaVirtualMachines/jdk1.8.0_291.jdk/Contents/Home/jre
Default locale: zh_CN, platform encoding: UTF-8
OS name: "mac os x", version: "10.16", arch: "x86_64", family: "mac"
2
3
4
5
# 三、如何使用Maven构建项目?
# 1.POM文件
POM 代表工程对象模型。它是使用 Maven 工作时的基本组建,是一个 xml 文件。它被放在工程根目录下,文件命名为 pom.xml。
POM 包含了关于工程和各种配置细节的信息,Maven 使用这些信息构建工程。POM 也包含了目标和插件。当执行一个任务或者目标时,Maven 会查找当前目录下的 POM,从其中读取所需要的配置信息,然后执行目标。
常见的POM文件格式如下:
<project xmlns="http://maven.apache.org/POM/4.0.0"
   xmlns:xsi="http://www.w3.org/2001/XMLSchema-instance"
   xsi:schemaLocation="http://maven.apache.org/POM/4.0.0
   http://maven.apache.org/xsd/maven-4.0.0.xsd">
   <modelVersion>4.0.0</modelVersion>

   <groupId>com.sankuai</groupId>
   <artifactId>mavenTest</artifactId>
   <version>1.0</version>

</project>
2
3
4
5
6
7
8
9
10
11
需要说明的是每个工程应该只有一个 POM 文件。
- 所有的 POM 文件需要 project 元素和三个必须的字段:groupId, artifactId,version。
- 在仓库中的工程标识为 groupId:artifactId:version
- POM.xml 的根元素是 project,它有三个主要的子节点:
| 节点 | 描述 |
|---|---|
| groupId | 这是工程组的标识。它在一个组织或者项目中通常是唯一的。通常我们使用公司的域名倒置作为groupId,例如,三快在线的groupId为com.sankuai。 |
| artifactId | 这是工程的标识。它通常是工程的名称。例如,一个用来测试maven的项目名称为mavenTest。groupId 和 artifactId 一起定义了 artifact 在仓库中的位置。 |
| version | 这是工程的版本号。在 artifact 的仓库中,它用来区分不同的版本。例如: com.sankuai:mavenTest:1.0.0 com.sankuai:mavenTest:1.0.1 |
一般来说我们不需要自己手动编写POM文件,当使用Maven构建项目时会自动生成对应的POM文件。
# 2.使用Maven构建项目
Maven 使用**原型(archetype)**插件创建工程,并且Maven内置了大量的JAVA原型模版。通常我们有两种方法使用Maven来创建项目。在下面的例子中将演示两种使用Maven构建Java项目的方法。
# 2.1.使用命令行
1.打开命令行工具,跳转到合适的项目目录下,在此处使用~/workspace作为演示目录
cd ~/workspace
2.使用Maven命令行构建项目
mvn archetype:generate -DgroupId=com.sankuai -DartifactId=mavenTest -DarchetypeArtifactId=maven-archetype-quickstart
参数说明:
archetype:generate 构建项目
-DgroupId=com.sankuai 工程组设置为公司的名称
-DartifactId=mavenTest 指明项目名称
-DarchetypeArtifactId=maven-archetype-quickstart 使用Java原型插件,这个插件也是项目工程中使用最频繁的插件。
执行命令之后会展示如下输出信息,说明项目构建成功。
[INFO] Scanning for projects...
Downloading from meituan-dianping: http://pixel.sankuai.com/repository/mtdp/org/apache/maven/plugins/maven-metadata.xml
Downloading from meituan-dianping: http://pixel.sankuai.com/repository/mtdp/com/dianping/maven/plugins/maven-metadata.xml
Downloading from meituan-dianping: http://pixel.sankuai.com/repository/mtdp/org/unidal/maven/plugins/maven-metadata.xml
Downloading from meituan-dianping: http://pixel.sankuai.com/repository/mtdp/org/jvnet/hudson/tools/maven-metadata.xml
Downloaded from meituan-dianping: http://pixel.sankuai.com/repository/mtdp/org/unidal/maven/plugins/maven-metadata.xml (301 B at 2.7 kB/s)
Downloaded from meituan-dianping: http://pixel.sankuai.com/repository/mtdp/org/apache/maven/plugins/maven-metadata.xml (14 kB at 120 kB/s)
Downloaded from meituan-dianping: http://pixel.sankuai.com/repository/mtdp/com/dianping/maven/plugins/maven-metadata.xml (812 B at 7.1 kB/s)
Downloading from meituan-dianping: http://pixel.sankuai.com/repository/mtdp/org/codehaus/mojo/maven-metadata.xml
Downloaded from meituan-dianping: http://pixel.sankuai.com/repository/mtdp/org/jvnet/hudson/tools/maven-metadata.xml (705 B at 1.6 kB/s)
Downloaded from meituan-dianping: http://pixel.sankuai.com/repository/mtdp/org/codehaus/mojo/maven-metadata.xml (21 kB at 44 kB/s)
Downloading from meituan-dianping: http://pixel.sankuai.com/repository/mtdp/org/apache/maven/plugins/maven-archetype-plugin/maven-metadata.xml
Downloaded from meituan-dianping: http://pixel.sankuai.com/repository/mtdp/org/apache/maven/plugins/maven-archetype-plugin/maven-metadata.xml (981 B at 2.0 kB/s)
[INFO]
[INFO] ------------------< org.apache.maven:standalone-pom >-------------------
[INFO] Building Maven Stub Project (No POM) 1
[INFO] --------------------------------[ pom ]---------------------------------
[INFO]
[INFO] >>> maven-archetype-plugin:3.2.1:generate (default-cli) > generate-sources @ standalone-pom >>>
[INFO]
[INFO] <<< maven-archetype-plugin:3.2.1:generate (default-cli) < generate-sources @ standalone-pom <<<
[INFO]
[INFO]
[INFO] --- maven-archetype-plugin:3.2.1:generate (default-cli) @ standalone-pom ---
[INFO] Generating project in Batch mode
[INFO] ----------------------------------------------------------------------------
[INFO] Using following parameters for creating project from Old (1.x) Archetype: maven-archetype-quickstart:1.0
[INFO] ----------------------------------------------------------------------------
[INFO] Parameter: basedir, Value: /Users/xuyang/workspace/mavenTestProject
[INFO] Parameter: package, Value: com.sankuai
[INFO] Parameter: groupId, Value: com.sankuai
[INFO] Parameter: artifactId, Value: mavenTest
[INFO] Parameter: packageName, Value: com.sankuai
[INFO] Parameter: version, Value: 1.0-SNAPSHOT
[INFO] project created from Old (1.x) Archetype in dir: /Users/xuyang/workspace/mavenTestProject/mavenTest
[INFO] ------------------------------------------------------------------------
[INFO] BUILD SUCCESS
[INFO] ------------------------------------------------------------------------
[INFO] Total time:  4.166 s
[INFO] Finished at: 2022-01-11T15:34:31+08:00
[INFO] ------------------------------------------------------------------------
2
3
4
5
6
7
8
9
10
11
12
13
14
15
16
17
18
19
20
21
22
23
24
25
26
27
28
29
30
31
32
33
34
35
36
37
38
39
40
41
现在进入到生成的项目文件夹中
cd mavenTest
所生成的文件结构如下:
.
└── mavenTest
    ├── pom.xml
    └── src
        ├── main
        │   └── java
        │       └── com
        │           └── sankuai
        │               └── App.java
        └── test
            └── java
                └── com
                    └── sankuai
                        └── AppTest.java
2
3
4
5
6
7
8
9
10
11
12
13
14
使用上面的例子,我们可以知道下面几个关键概念:
| 文件夹结构 | 描述 |
|---|---|
| mavenTest | 包含 src 文件夹和 pom.xml |
| src/main/java | java 代码文件在包结构下(com/sankuai)。 |
| src/main/test | 测试代码文件在包结构下(com/sankuai)。 |
| src/main/resources | 包含了属性文件(在上面的例子中,我们需要手动创建这个结构)。 |
Maven 也创建了一个简单的 Java 源文件和 Java 测试文件。
package com.sankuai;

/**
 * Hello world!
 *
 */
public class App
{
    public static void main( String[] args )
    {
        System.out.println( "Hello World!" );
    }
}
package com.sankuai;

import junit.framework.Test;
import junit.framework.TestCase;
import junit.framework.TestSuite;

/**
 * Unit test for simple App.
 */
public class AppTest
    extends TestCase
{
    /**
     * Create the test case
     *
     * @param testName name of the test case
     */
    public AppTest( String testName )
    {
        super( testName );
    }

    /**
     * @return the suite of tests being tested
     */
    public static Test suite()
    {
        return new TestSuite( AppTest.class );
    }

    /**
     * Rigourous Test :-)
     */
    public void testApp()
    {
        assertTrue( true );
    }
}
2
3
4
5
6
7
8
9
10
11
12
13
14
15
16
17
18
19
20
21
22
23
24
25
26
27
28
29
30
31
32
33
34
35
36
37
38
39
40
41
42
43
44
45
46
47
48
49
50
51
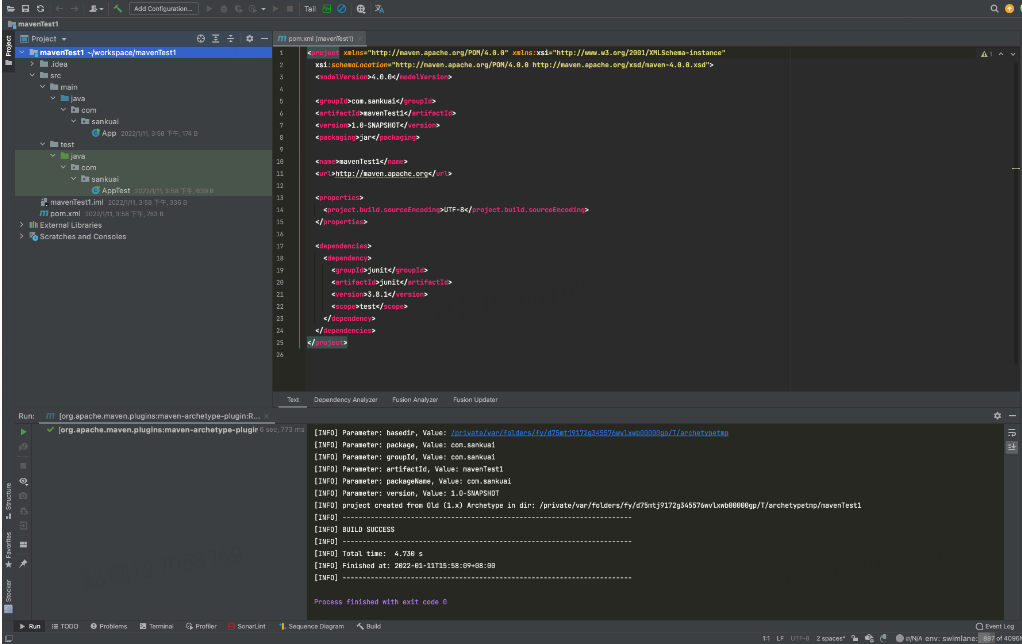
# 2.2.使用IDEA
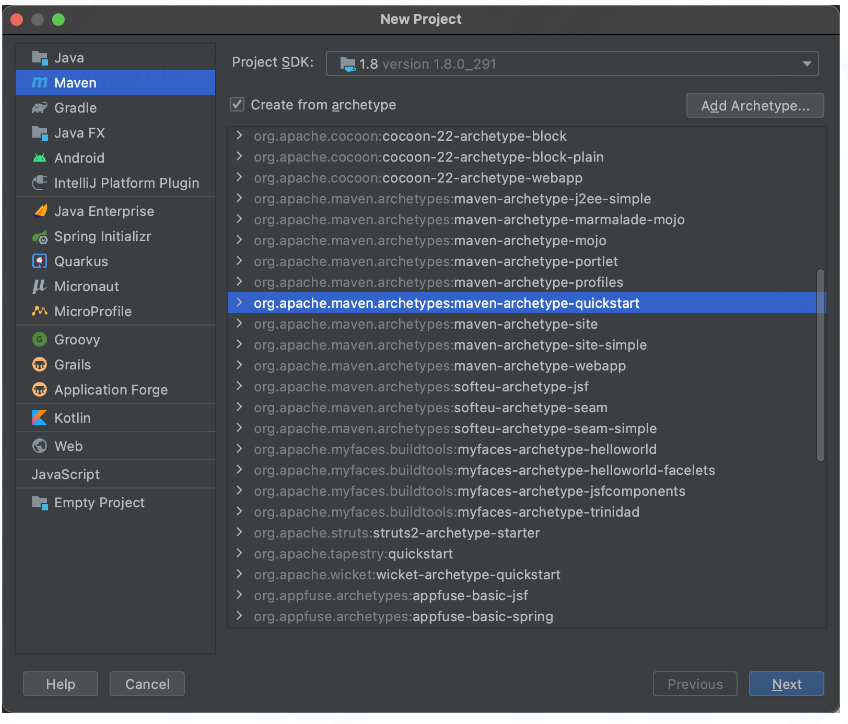
使用IDEA开发环境可以快速通过图形界面生成Java项目,接下来展示如何使用IDEA生成Maven项目。
1.在新建项目页面选择Maven,并在右侧选择使用archetype
2.点击next,设置项目groupId和artifactId
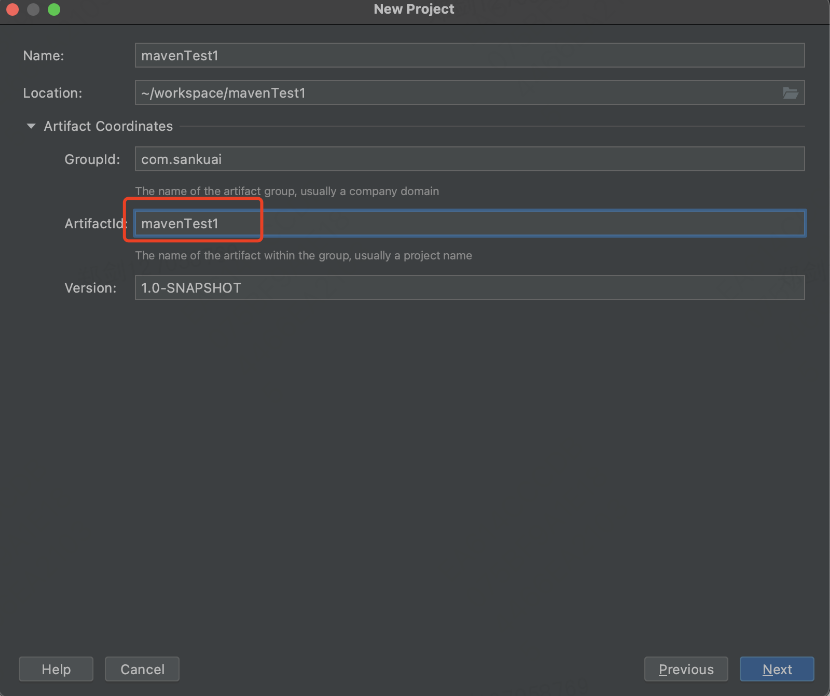
需要注意的是,我们无需手动输入Name以及Location,输入artifactId时会自动生成。
3.点击next,校验构建清单
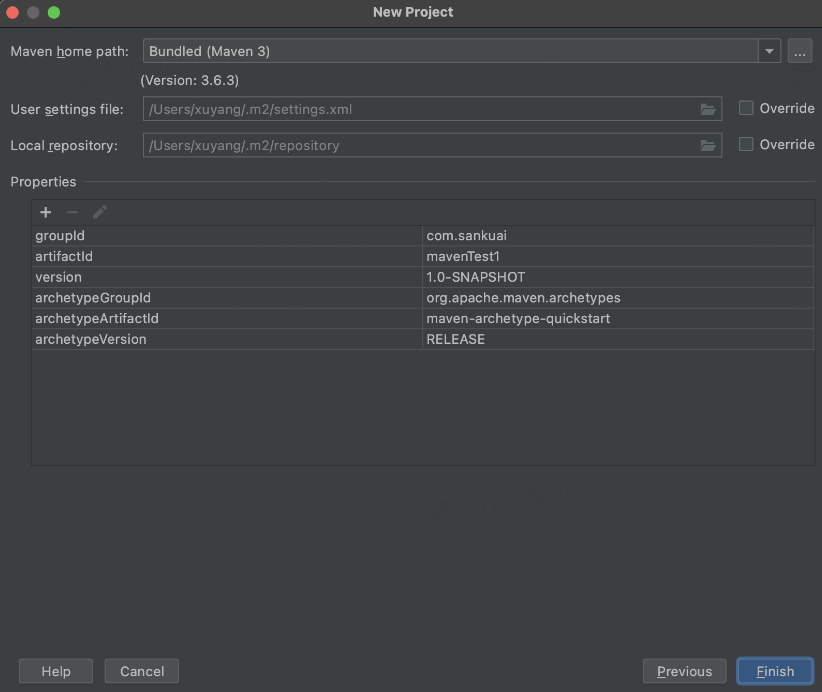
4.点击finish完成构建,之后IDEA就会自动构建Java项目了。
# 3.使用Maven打包项目
接下来我们将使用Maven对项目进行打包,我们可以使用以下两种方案对Java项目进行打包
# 3.1.使用命令行打包
1.使用cd命令进入到项目的根路径。
cd mavenTest
2.使用package对项目进行打包
mvn clean package
参数说明:
clean 是maven内置的生命周期之一,使用maven打包会在项目生成target文件夹,其中用来存放1)被编译之后的class文件,2)打包生成的最终jar文件
package 是maven内置的生命周期之一,用来对项目进行打包生成jar可执行文件
执行之后,会输出一下内容
[INFO] Scanning for projects...
[INFO]
[INFO] -----------------------< com.sankuai:mavenTest >------------------------
[INFO] Building mavenTest 1.0-SNAPSHOT
[INFO] --------------------------------[ jar ]---------------------------------
[INFO]
[INFO] --- maven-clean-plugin:2.5:clean (default-clean) @ mavenTest ---
[INFO]
[INFO] --- maven-resources-plugin:2.6:resources (default-resources) @ mavenTest ---
[WARNING] Using platform encoding (UTF-8 actually) to copy filtered resources, i.e. build is platform dependent!
[INFO] skip non existing resourceDirectory /Users/xuyang/workspace/mavenTestProject/mavenTest/src/main/resources
[INFO]
[INFO] --- maven-compiler-plugin:3.1:compile (default-compile) @ mavenTest ---
[INFO] Changes detected - recompiling the module!
[WARNING] File encoding has not been set, using platform encoding UTF-8, i.e. build is platform dependent!
[INFO] Compiling 1 source file to /Users/xuyang/workspace/mavenTestProject/mavenTest/target/classes
[INFO]
[INFO] --- maven-resources-plugin:2.6:testResources (default-testResources) @ mavenTest ---
[WARNING] Using platform encoding (UTF-8 actually) to copy filtered resources, i.e. build is platform dependent!
[INFO] skip non existing resourceDirectory /Users/xuyang/workspace/mavenTestProject/mavenTest/src/test/resources
[INFO]
[INFO] --- maven-compiler-plugin:3.1:testCompile (default-testCompile) @ mavenTest ---
[INFO] Changes detected - recompiling the module!
[WARNING] File encoding has not been set, using platform encoding UTF-8, i.e. build is platform dependent!
[INFO] Compiling 1 source file to /Users/xuyang/workspace/mavenTestProject/mavenTest/target/test-classes
[INFO]
[INFO] --- maven-surefire-plugin:2.12.4:test (default-test) @ mavenTest ---
[INFO] Surefire report directory: /Users/xuyang/workspace/mavenTestProject/mavenTest/target/surefire-reports
Downloading from meituan-dianping: http://pixel.sankuai.com/repository/mtdp/org/apache/maven/surefire/surefire-junit3/2.12.4/surefire-junit3-2.12.4.pom
Downloaded from meituan-dianping: http://pixel.sankuai.com/repository/mtdp/org/apache/maven/surefire/surefire-junit3/2.12.4/surefire-junit3-2.12.4.pom (1.7 kB at 3.7 kB/s)
Downloading from meituan-dianping: http://pixel.sankuai.com/repository/mtdp/org/apache/maven/surefire/surefire-providers/2.12.4/surefire-providers-2.12.4.pom
Downloaded from meituan-dianping: http://pixel.sankuai.com/repository/mtdp/org/apache/maven/surefire/surefire-providers/2.12.4/surefire-providers-2.12.4.pom (2.3 kB at 10.0 kB/s)
Downloading from meituan-dianping: http://pixel.sankuai.com/repository/mtdp/org/apache/maven/surefire/surefire-junit3/2.12.4/surefire-junit3-2.12.4.jar
Downloaded from meituan-dianping: http://pixel.sankuai.com/repository/mtdp/org/apache/maven/surefire/surefire-junit3/2.12.4/surefire-junit3-2.12.4.jar (26 kB at 231 kB/s)

-------------------------------------------------------
 T E S T S
-------------------------------------------------------
Running com.sankuai.AppTest
Tests run: 1, Failures: 0, Errors: 0, Skipped: 0, Time elapsed: 0.005 sec

Results :

Tests run: 1, Failures: 0, Errors: 0, Skipped: 0

[INFO]
[INFO] --- maven-jar-plugin:2.4:jar (default-jar) @ mavenTest ---
[INFO] Building jar: /Users/xuyang/workspace/mavenTestProject/mavenTest/target/mavenTest-1.0-SNAPSHOT.jar
[INFO] ------------------------------------------------------------------------
[INFO] BUILD SUCCESS
[INFO] ------------------------------------------------------------------------
[INFO] Total time:  3.182 s
[INFO] Finished at: 2022-01-11T16:14:39+08:00
[INFO] ------------------------------------------------------------------------
2
3
4
5
6
7
8
9
10
11
12
13
14
15
16
17
18
19
20
21
22
23
24
25
26
27
28
29
30
31
32
33
34
35
36
37
38
39
40
41
42
43
44
45
46
47
48
49
50
51
52
53
54
在根路径下会自动生成target文件夹
.
├── pom.xml
├── src
│   ├── main
│   │   └── java
│   │       └── com
│   │           └── sankuai
│   │               └── App.java
│   └── test
│       └── java
│           └── com
│               └── sankuai
│                   └── AppTest.java
└── target
    ├── classes
    │   └── com
    │       └── sankuai
    │           └── App.class
    ├── maven-archiver
    │   └── pom.properties
    ├── maven-status
    │   └── maven-compiler-plugin
    │       ├── compile
    │       │   └── default-compile
    │       │       ├── createdFiles.lst
    │       │       └── inputFiles.lst
    │       └── testCompile
    │           └── default-testCompile
    │               ├── createdFiles.lst
    │               └── inputFiles.lst
    ├── mavenTest-1.0-SNAPSHOT.jar
    ├── surefire-reports
    │   ├── TEST-com.sankuai.AppTest.xml
    │   └── com.sankuai.AppTest.txt
    └── test-classes
        └── com
            └── sankuai
                └── AppTest.class
2
3
4
5
6
7
8
9
10
11
12
13
14
15
16
17
18
19
20
21
22
23
24
25
26
27
28
29
30
31
32
33
34
35
36
37
38
其中mavenTest-1.0-SNAPSHOT.jar就是项目打包生成的可执行文件,其中-1.0-SNAPSHOT是项目的版本号信息。
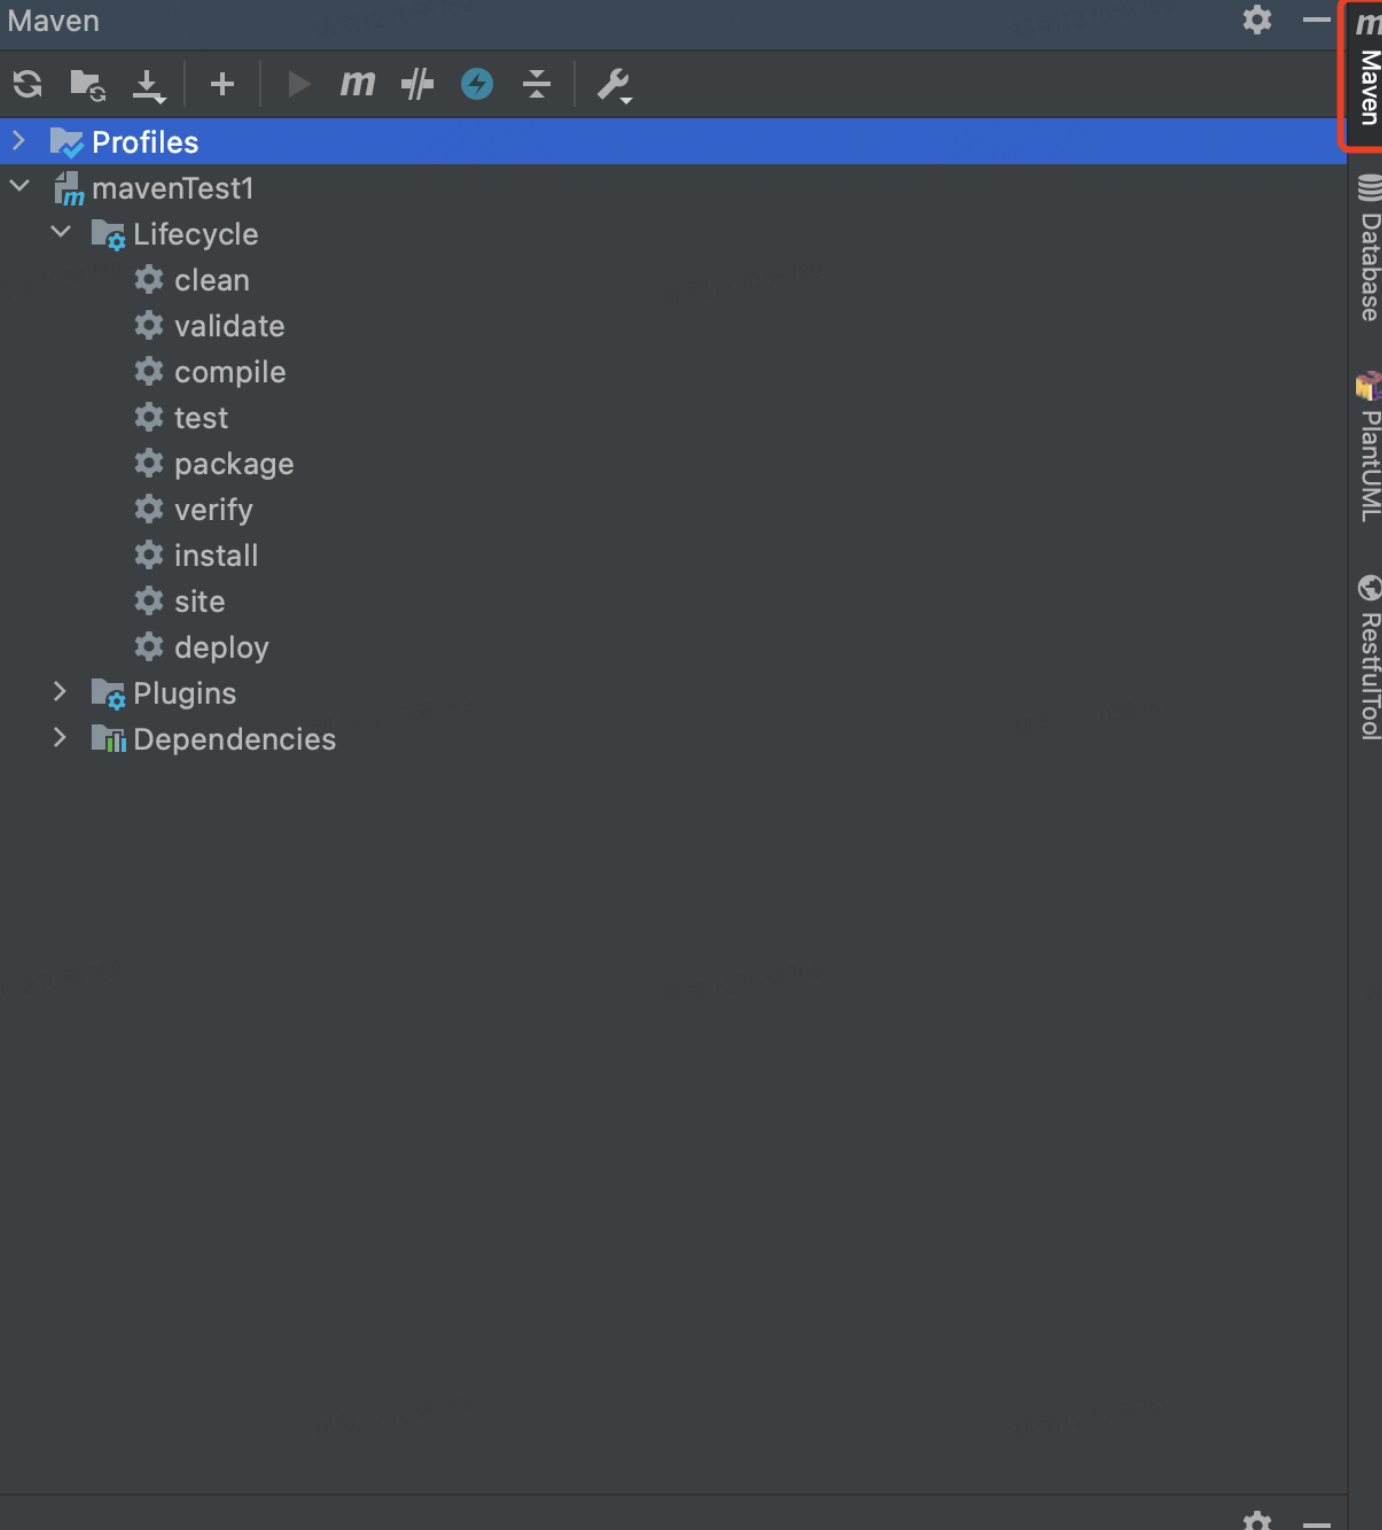
# 3.2.使用IDEA
1.可在IDEA右侧边栏上找到Maven菜单
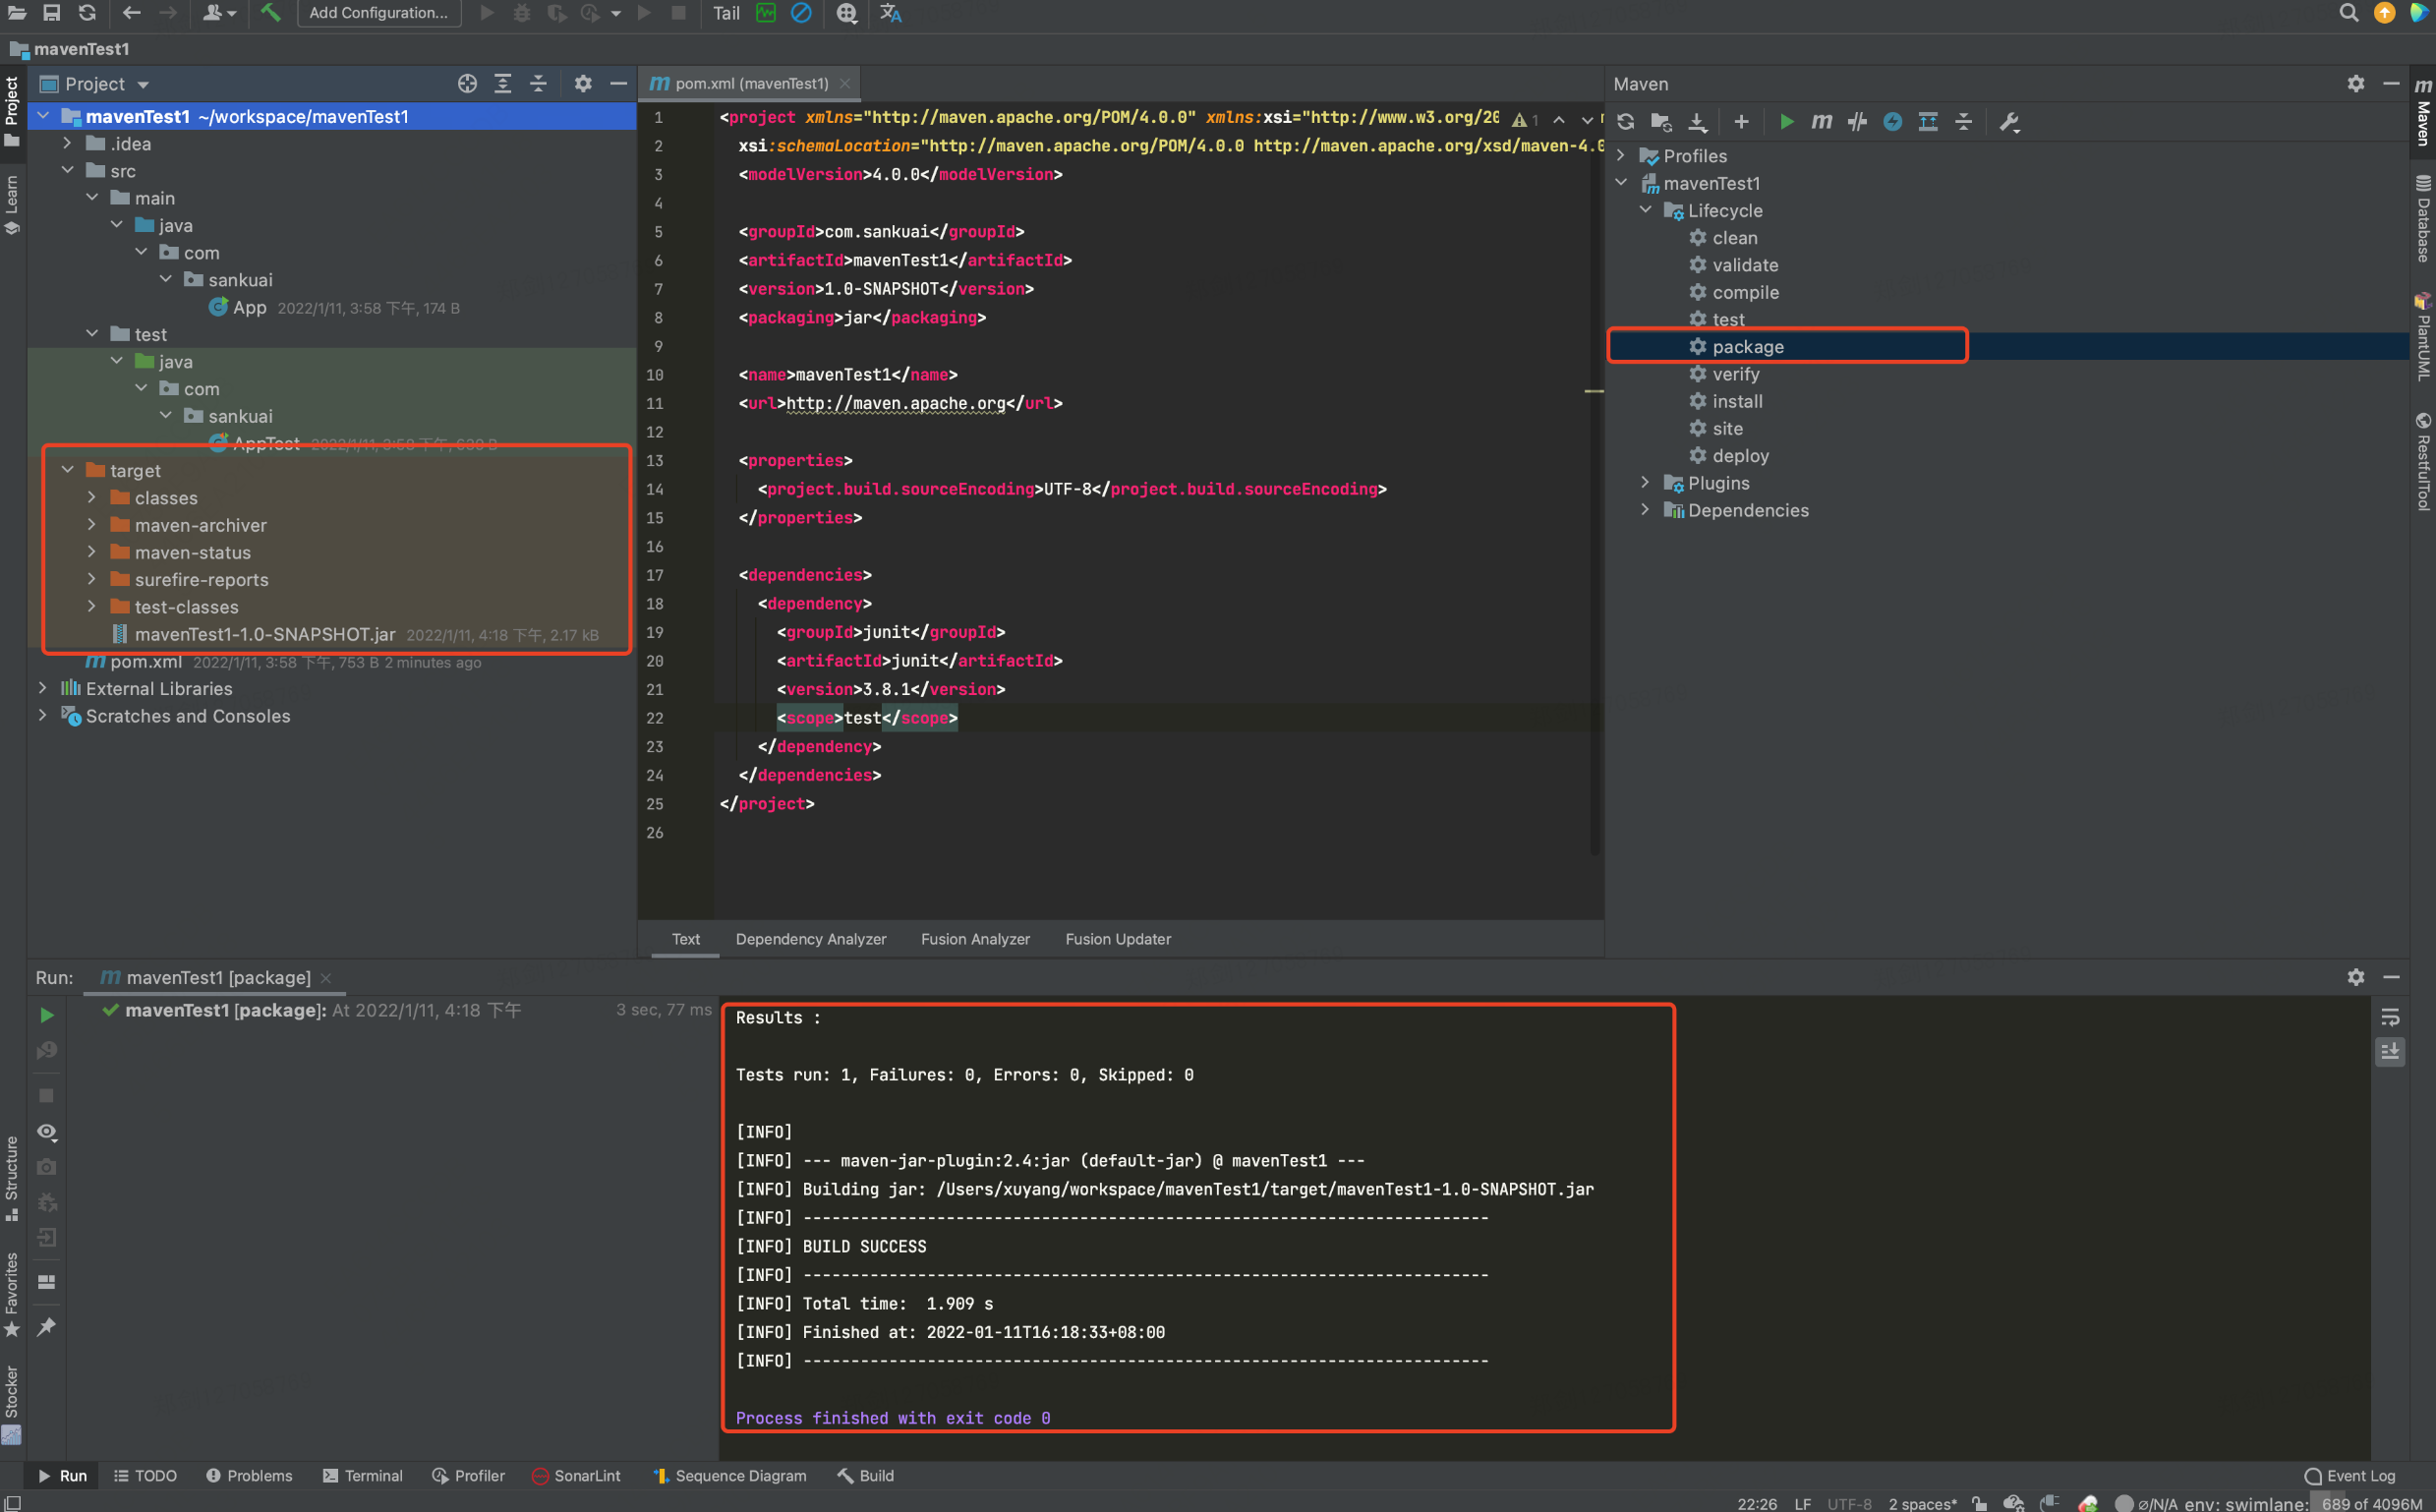
2.分别双击clean和package按钮就会在当前项目中生成target文件,整个流程比命令行更方便。
# 2. 依赖管理
# 一、创建一个maven项目
官方文档:
# 1.使用Idea创建一个maven项目
- File>New>Project,
- 左侧选择Maven,右侧选择Project SDK为1.8,点击Next
- 输入项目GroupId、ArtifactId,点击Next
- 点击Finish
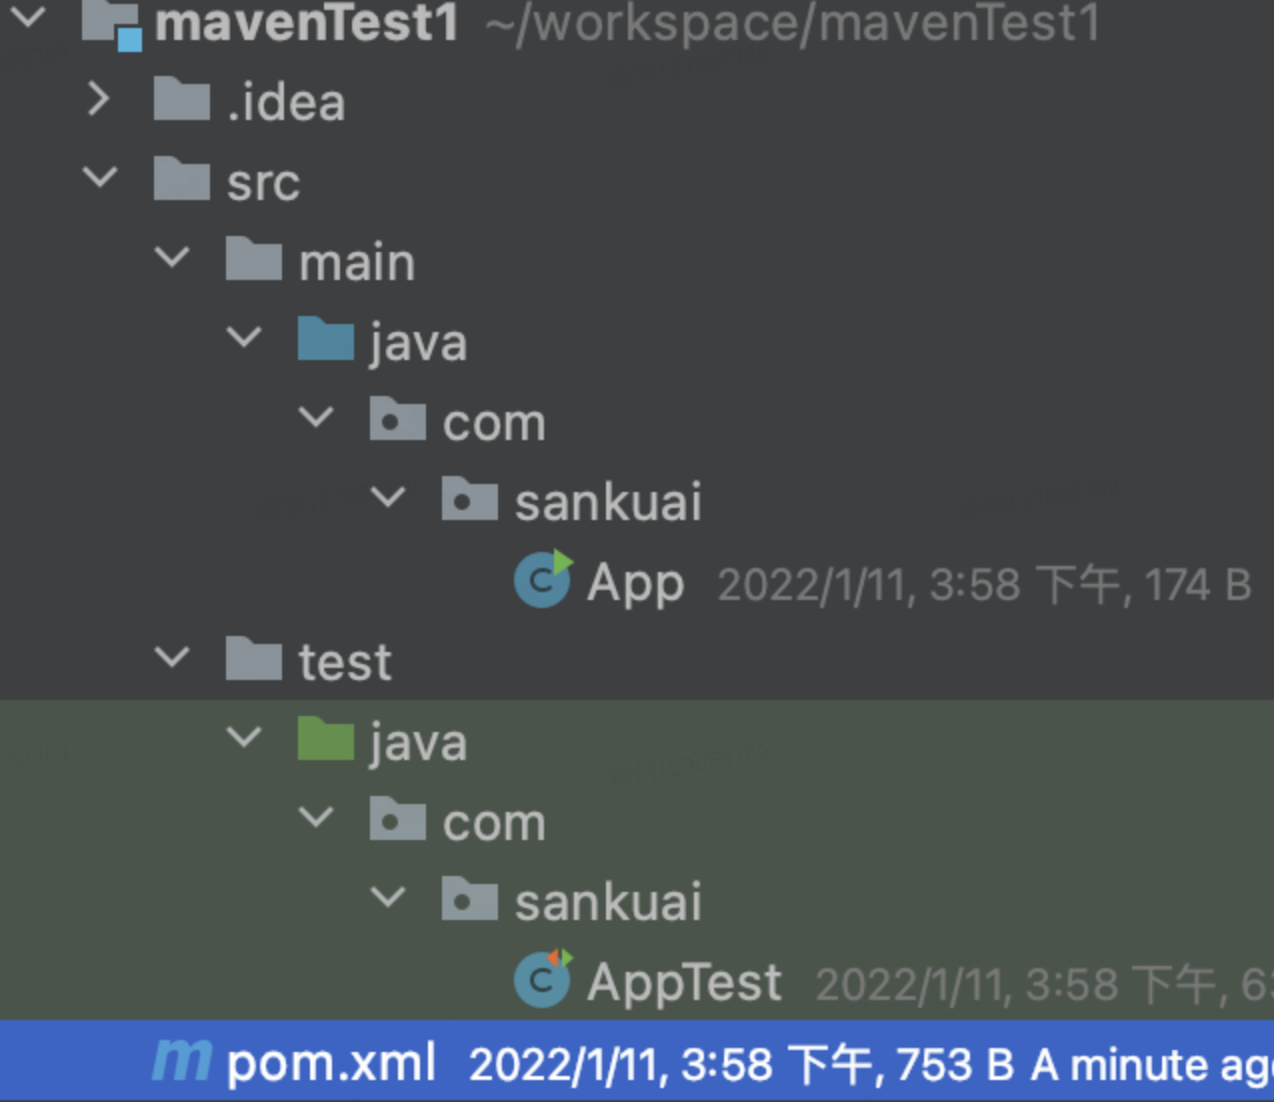
# 2.项目目录结构
# 3.pom文件
<project xmlns="http://maven.apache.org/POM/4.0.0" xmlns:xsi="http://www.w3.org/2001/XMLSchema-instance"
  xsi:schemaLocation="http://maven.apache.org/POM/4.0.0 http://maven.apache.org/xsd/maven-4.0.0.xsd">
  <modelVersion>4.0.0</modelVersion>

  <groupId>com.sankuai</groupId>
  <artifactId>mavenTest1</artifactId>
  <version>1.0-SNAPSHOT</version>
  <packaging>jar</packaging>

  <name>mavenTest1</name>
  <url>http://maven.apache.org</url>

  <properties>
    <project.build.sourceEncoding>UTF-8</project.build.sourceEncoding>
  </properties>

  <dependencies>
    <dependency>
      <groupId>junit</groupId>
      <artifactId>junit</artifactId>
      <version>3.8.1</version>
      <scope>test</scope>
    </dependency>
  </dependencies>
</project>
2
3
4
5
6
7
8
9
10
11
12
13
14
15
16
17
18
19
20
21
22
23
24
25
# 二、约定优于配置
# 1.项目目录结构遵循约定
创建的maven空项目已经包含了一定的目录结构,需要开发者遵循这种目录约定,这是使用maven简洁配置需要付出的代价。
| 目录 | 说明 |
|---|---|
| {project.basedir} | 存放pom文件和项目子模块 |
| {project.basedir}/src/main/java | 源码目录 |
| {project.basedir}/src/main/resources | 资源目录 |
| {project.basedir}/src/test/java | 测试源码目录 |
| {project.basedir}/src/test/resources | 测试资源目录 |
| ${project.basedir}/target | 包输出目录 |
| ${project.basedir}/target/classes | 编译输出目录 |
| ${project.basedir}/target/test-classes | 测试编译输出目录 |
# 三、POM文件
# 1.说明
POM(Project Object Model,项目对象模型)定义了项目的基本信息,用于描述项目如何构建、声明项目依赖。
# 2.简单配置
- <?xml>: xml头信息,定义xml文档的版本和编码方式。
: 所有pom.xml的根元素,声明了pom相关的命名空间和xsd元素。 : 指定当前pom模型的版本,对于maven2/3,只能是4.0.0。 : 定义当前maven项目隶属的实际项目。 : 定义实际项目中的一个maven模块/项目。 : 定义maven项目当前所处的版本 - groupId\artifactId\version: 定义了一个项目基本的坐标。
# 3.其他配置
- 项目依赖
- 插件
- 执行目标
- 项目构建profile
# 四、MAVEN坐标
# 1.说明
Maven定义了一组规则:世界上任何一个构件都可以使用Maven坐标唯一标识。 Maven坐标元素包括groupId, artifactId, version, packaging, classifier。
# 2.坐标元素
- groupId: 定义当前maven项目隶属的实际项目。
- artifactId: 定义实际项目中的一个maven模块/项目。
- version: 定义maven项目当前所处的版本。
- packaging: 定义maven项目的打包方式。打包方式与生成构件的文件扩展名对应,默认为jar, 常用的打包方式有jar, war, pom。
- classifier: 帮助定义构建输出的附属构件。附属构件与主构件对应。如demo1-1.0-SNAPSHOT-sources.jar这个构件,包含了主构件的源代码。不能直接定义项目的classifier,因为附属构件不是项目直接默认生成的,而是通过附加插件帮助生成的。
# 3.项目构件的文件名
- 一般规则为: artifactId-version[-classifier].packaging
# 五、MAVEN依赖
# 1.使用maven怎么引入依赖?
如果要引入第三方jar包,需要知道jar的坐标,然后放入pom.xml中的dependencies元素中。 示例如下:
  <dependencies>
    <dependency>
      <groupId>junit</groupId>
      <artifactId>junit</artifactId>
      <version>3.8.1</version>
      <scope>test</scope>
    </dependency>
  </dependencies>
1
2
3
4
5
6
7
8dependencies元素包含多个dependency,每个dependency代表项目依赖的一个构件信息。
dependency元素中的 groupId, artifactId,version定义了一个构件的基本坐标。
type被依赖构件的类型,对应于被依赖构件的packaging。默认为jar, 表示被依赖的构件是一个jar包。
scope表示依赖的范围,参考下文 2.maven依赖范围。
optional表示依赖是否可选,参考可选依赖。
exclusions用来排除传递依赖。
# 2.maven依赖范围
依赖范围就是用来控制依赖与三种classpath(编译classpath,运行classpath,测试classpath【编译测试代码、运行测试代码】)的关系。
compile: 编译依赖范围。如果未指定,默认使用该依赖范围。对于编译、测试、运行3种classpath都有效。比如spring-web。
test: 测试依赖范围。只对测试classpath有效,在编译主代码、运行项目时无法使用此依赖。比如JUnit。
provided: 已提供依赖范围。对于编译、测试classpath有效,但在运行时无效。比如servlet-api,在运行项目的时候容器已经提供了。
runtime: 运行时依赖范围。对于测试、运行classpath有效,但在编译主代码时无效。比如jdbc驱动实现,运行的时候才需要具体的jdbc驱动实现。
system: 系统依赖范围。该依赖与三种classpath的关系,和provided依赖范围完全一致。但是,使用system范围的依赖时必须通过systemPath元素显示指定依赖文件的路径。建议谨慎使用。
<dependency>
  <groupId>com.john</groupId>
  <artifactId>rt</artifactId>
  <version>1.8</version>
  <scope>system</scope>
  <systemPath>${java.home}/lib/rt.jar</systemPath>
</dependency>
1
2
3
4
5
6
7import: 导入依赖范围。在maven依赖和dependencyManagement时候用到。
# 3.依赖范围与classpath的关系
| 依赖范围** **(scope) | 对于编译classpath有效 | 对于测试classpath有效 | 对于运行classpath有效 | 举例 |
|---|---|---|---|---|
| compile | Y | Y | Y | spring-web |
| test | -- | Y | -- | JUnit |
| provided | Y | Y | -- | servlet-api |
| runtime | -- | Y | Y | JDBC驱动实现 |
| system | Y | Y | -- | 本地的jar包 |
# 4.scope与运行classpath
scope如果对于运行范围有效,是指依赖的jar包会被打包到项目的运行包中,最后运行的时候会被添加到classpath中运行。 如果scope对于运行项目无效,那么项目打包的时候,这些依赖不会被打包到运行包中。
# 六、传递性依赖
# 1.说明
 <dependencies>
    <dependency>
      <groupId>junit</groupId>
      <artifactId>junit</artifactId>
      <version>3.8.1</version>
      <scope>test</scope>
    </dependency>
  </dependencies>
2
3
4
5
6
7
8
- 在项目中引入junit,查看项目依赖,发现项目又依赖org.hamcrest:hamcrest-core:1.3,该依赖也被自动加进来,这个叫做依赖的传递。
- 假设A依赖于B,B依赖于C,我们说A对于B是第一直接依赖,B对于C是第二直接依赖,而A对于C是传递性依赖。
- 第一直接依赖的范围和第二直接依赖的范围决定了传递依赖的范围。
# 2.依赖范围对传递性依赖的影响
| 第一直接依赖\第二直接依赖 | compile | test | provided | runtime |
|---|---|---|---|---|
| compile | compile | -- | -- | runtime |
| test | test | -- | -- | test |
| provided | provided | -- | provided | provided |
| runtime | runtime | -- | -- | runtime |
# 七、依赖调解
# 1.第一原则:路径近者优先。
- A->B->C->Y(1.0),A->D->Y(2.0),Y的2.0版本距离A更近一些,所以maven会选择2.0
# 2.第二原则:第一声明者优先。
- A->B->Y(1.0),A->D->Y(2.0),Y的1.0版先声明,所以maven会选择1.0版本。
# 八、可选依赖
A->B, scope:compile B->X, scope:compile,optional:true B->Y, scope:compile,optional:true
- X、Y是可选依赖,依赖不会由B传至A。X、Y不会对A造成影响。
- 理想情况下,不应该使用可选依赖。
# 九、依赖管理最佳实践
# 1.排除依赖
前提
A->B, scope:compile B->C, scope:compile
目的:A不想引入传递性依赖C
使用exclusions元素声明排除依赖,exclusions元素可以包含多个exclusion元素。
声明exclusion元素时只需要groupId和artifactId
# 2.归类依赖
使用properties元素定义maven属性
<properties>
  <springframework.version>5.2.1.RELEASE</springframework.version>
</properties>
1
2
3
# 3.优化依赖
查看当前项目的已解析依赖(Resolved Dependency)
mvn dependency:list1[INFO] Scanning for projects... [INFO] [INFO] -----------------------< com.sankuai:mavenTest1 >----------------------- [INFO] Building mavenTest1 1.0-SNAPSHOT [INFO] --------------------------------[ jar ]--------------------------------- [INFO] [INFO] --- maven-dependency-plugin:2.8:list (default-cli) @ mavenTest1 --- [INFO] [INFO] The following files have been resolved: [INFO] junit:junit:jar:3.8.1:test [INFO] [INFO] ------------------------------------------------------------------------ [INFO] BUILD SUCCESS [INFO] ------------------------------------------------------------------------ [INFO] Total time: 1.355 s [INFO] Finished at: 2022-01-12T17:11:56+08:00 [INFO] ------------------------------------------------------------------------1
2
3
4
5
6
7
8
9
10
11
12
13
14
15
16
17查看当前项目的依赖树
mvn dependency:tree1[INFO] Scanning for projects... [INFO] [INFO] -----------------------< com.sankuai:mavenTest1 >----------------------- [INFO] Building mavenTest1 1.0-SNAPSHOT [INFO] --------------------------------[ jar ]--------------------------------- [INFO] [INFO] --- maven-dependency-plugin:2.8:tree (default-cli) @ mavenTest1 --- [INFO] com.sankuai:mavenTest1:jar:1.0-SNAPSHOT [INFO] \- junit:junit:jar:3.8.1:test [INFO] ------------------------------------------------------------------------ [INFO] BUILD SUCCESS [INFO] ------------------------------------------------------------------------ [INFO] Total time: 0.856 s [INFO] Finished at: 2022-01-12T17:12:30+08:00 [INFO] ------------------------------------------------------------------------1
2
3
4
5
6
7
8
9
10
11
12
13
14
15分析当前项目的依赖
mvn dependency:analyze1[INFO] Scanning for projects... [INFO] [INFO] -----------------------< com.sankuai:mavenTest1 >----------------------- [INFO] Building mavenTest1 1.0-SNAPSHOT [INFO] --------------------------------[ jar ]--------------------------------- [INFO] [INFO] >>> maven-dependency-plugin:2.8:analyze (default-cli) > test-compile @ mavenTest1 >>> [INFO] [INFO] --- maven-resources-plugin:2.6:resources (default-resources) @ mavenTest1 --- [INFO] Using 'UTF-8' encoding to copy filtered resources. [INFO] skip non existing resourceDirectory /Users/xuyang/workspace/mavenTest1/src/main/resources [INFO] [INFO] --- maven-compiler-plugin:3.1:compile (default-compile) @ mavenTest1 --- [INFO] Changes detected - recompiling the module! [INFO] Compiling 1 source file to /Users/xuyang/workspace/mavenTest1/target/classes [INFO] [INFO] --- maven-resources-plugin:2.6:testResources (default-testResources) @ mavenTest1 --- [INFO] Using 'UTF-8' encoding to copy filtered resources. [INFO] skip non existing resourceDirectory /Users/xuyang/workspace/mavenTest1/src/test/resources [INFO] [INFO] --- maven-compiler-plugin:3.1:testCompile (default-testCompile) @ mavenTest1 --- [INFO] Changes detected - recompiling the module! [INFO] Compiling 1 source file to /Users/xuyang/workspace/mavenTest1/target/test-classes [INFO] [INFO] <<< maven-dependency-plugin:2.8:analyze (default-cli) < test-compile @ mavenTest1 <<< [INFO] [INFO] [INFO] --- maven-dependency-plugin:2.8:analyze (default-cli) @ mavenTest1 --- [INFO] No dependency problems found [INFO] ------------------------------------------------------------------------ [INFO] BUILD SUCCESS [INFO] ------------------------------------------------------------------------ [INFO] Total time: 1.902 s [INFO] Finished at: 2022-01-12T17:13:05+08:00 [INFO] ------------------------------------------------------------------------1
2
3
4
5
6
7
8
9
10
11
12
13
14
15
16
17
18
19
20
21
22
23
24
25
26
27
28
29
30
31
32
33
34
35
# 3. 仓库
# 一、引入
- maven坐标和依赖是一个构件在maven世界中的逻辑表示方式,而构件的物理表示方式是文件。
- maven通过仓库来统一管理这些构件。
- maven项目将不再各自存储其依赖文件,只需要声明依赖坐标。
- maven采用引用的方式将依赖的jar引入进来,不对真实的jar进行拷贝,但是打包的时候,运行需要用到的jar都会被拷贝到安装包
# 二、仓库分类
- 本地仓库
- 远程仓库: 中央仓库、私服、其他公共仓库
# 1.本地仓库
在安装maven后本地仓库并不存在,当我们执行第一条maven命令的时候才会创建本地仓库。
默认情况下,maven本地仓库默认地址是~/.m2/respository目录,
用户可以自定义本地仓库目录,在~/.m2/settings.xml文件中进行修改
下载构件:从远程仓库下载到本地仓库目录中
使用本地项目构件:将本地项目构件安装到maven本地仓库
mvn clean install1
# 2.远程仓库
- 本地仓库不存在构件时,需要从远程仓库下载构件。
# 3.中央仓库
在maven的超级pom中可以看到默认的中央仓库。
超级pom:所有maven项目都会继承,其中的配置会自动继承。
超级pom所在文件:${M2_HOME}/lib/maven-model-builder-3.6.3.jar
解压jar文件
查看lib/org/apache/maven/model/pom-4.0.0.xml
找到中央仓库的默认配置:
<repositories>
  <repository>
    <id>central</id>
    <name>Central Repository</name>
    <url>https://repo.maven.apache.org/maven2</url>
    <layout>default</layout>
    <snapshots> <!-- 不从该中央仓库下载快照版本的构件 -->
      <enabled>false</enabled>
    </snapshots>
  </repository>
</repositories>
1
2
3
4
5
6
7
8
9
10
11
默认的中央仓库:
# 4.私服
- 私服是一种特殊的远程仓库,是架设在局域网内的仓库服务。
- 私服代理广域网上的远程仓库,供局域网内的maven用户使用。
- 私服的好处:
- 节省自己的外网带宽。
- 加速maven构建。
- 部署第三方构件。
- 提高稳定性,增强控制。
- 降低中央仓库的负荷。
# 5.其他远程仓库
- 公司的远程仓库:http://pixel.sankuai.com/
- 美团的Settings:Settings.xml (opens new window)
# 三、远程仓库配置
# 1.在项目POM中配置远程仓库(项目)
说明:该配置只对当前项目有效。
配置信息
<repositories>
  <repository>
    <id>meituan-dianping-releases</id>
    <name>Repository for releases artifacts</name>
    <url>http://pixel.sankuai.com/repository/group-releases</url>
    <snapshots>
      <enabled>false</enabled>
    </snapshots>
  <releases>
    <enabled>true</enabled>
    <updatePolicy>always</updatePolicy>
  </releases>
  </repository>

  <repository>
    <id>meituan-dianping-snapshots</id>
    <name>Repository for snapshots artifacts</name>
    <url>http://pixel.sankuai.com/repository/group-snapshots</url>
    <snapshots>
      <enabled>true</enabled>
      <updatePolicy>always</updatePolicy>
    </snapshots>
    <releases>
      <enabled>false</enabled>
    </releases>
  </repository>
</repositories>
1
2
3
4
5
6
7
8
9
10
11
12
13
14
15
16
17
18
19
20
21
22
23
24
25
26
27repositories->repository元素说明
- repositories元素下可以使用repository子元素声明一个或多个远程仓库。
- id:远程仓库标识,id名称唯一。注意:maven自带的中央仓库id为central,如果其他的仓库声明也使用该id,会覆盖中央仓库的配置。
- url:远程仓库地址。
- releases:用来控制对于发布版本构件的下载。
- enabled属性表示是否开启发布版本的下载支持。
- updatePolicy:用来配置maven从远程仓库更新的频率。
- 默认为daily,表示每天检查一次。
- never,从不检查更新。
- always,每次构建都检查更新。
- interval: X,每隔X分钟检查更新一次(X为任意整数)
- checksumPolicy:用来配置maven检查校验和文件的策略。
- 默认为warn,执行构建时给出警告信息。
- fail,遇到校验和错误,就让构建失败。
- ignore,让maven完全忽略校验和错误。
- snapshots:用来控制对于快照版本构件的下载。
- enabled属性表示是否开启快照版本的下载支持。
- 快照版本的构件以-SNAPSHOT结尾,发布版本没有这个标识。
- layout:default表示仓库的布局是maven2或者maven3的默认布局,而不是maven1的布局。
测试远程仓库能否正常拉取依赖
以项目mavenTest1为例。
  <dependencies>
    <dependency>
      <groupId>org.projectlombok</groupId>
      <artifactId>lombok</artifactId>
      <version>1.18.16</version>
    </dependency>
  </dependencies>
1
2
3
4
5
6
7首先,删除${localRepository}/org/projectlombok/lombok目录文件,此时本地仓库无依赖。
切换到项目目录,在终端执行mvn compile
查看终端输出。
[INFO] Scanning for projects...
[INFO]
[INFO] -----------------------< com.sankuai:mavenTest1 >-----------------------
[INFO] Building mavenTest1 1.0-SNAPSHOT
[INFO] --------------------------------[ jar ]---------------------------------
Downloading from meituan-dianping: http://pixel.sankuai.com/repository/mtdp/org/projectlombok/lombok/1.18.16/lombok-1.18.16.pom
Downloaded from meituan-dianping: http://pixel.sankuai.com/repository/mtdp/org/projectlombok/lombok/1.18.16/lombok-1.18.16.pom (1.5 kB at 4.0 kB/s)
Downloading from meituan-dianping: http://pixel.sankuai.com/repository/mtdp/org/projectlombok/lombok/1.18.16/lombok-1.18.16.jar
Downloaded from meituan-dianping: http://pixel.sankuai.com/repository/mtdp/org/projectlombok/lombok/1.18.16/lombok-1.18.16.jar (1.9 MB at 2.8 MB/s)
[INFO]
[INFO] --- maven-resources-plugin:2.6:resources (default-resources) @ mavenTest1 ---
[INFO] Using 'UTF-8' encoding to copy filtered resources.
[INFO] skip non existing resourceDirectory /Users/xuyang/workspace/mavenTest1/src/main/resources
[INFO]
[INFO] --- maven-compiler-plugin:3.1:compile (default-compile) @ mavenTest1 ---
[INFO] Nothing to compile - all classes are up to date
[INFO] ------------------------------------------------------------------------
[INFO] BUILD SUCCESS
[INFO] ------------------------------------------------------------------------
[INFO] Total time:  3.726 s
[INFO] Finished at: 2022-01-12T19:05:58+08:00
[INFO] ------------------------------------------------------------------------
1
2
3
4
5
6
7
8
9
10
11
12
13
14
15
16
17
18
19
20
21
22观察Downloading from meituan-dianping后面就是在pom文件中配置的远程仓库,meituan-dianping是定义的仓库id。 在本地仓库缺少依赖后,就会从配置的远程仓库下载依赖。
# 2.在用户配置中配置镜像仓库(全局)
说明:该配置对所有使用该配置的项目都有效。
什么是镜像仓库?
- 如果仓库X可以提供仓库Y所有的内容,那么就可以认为X是Y的一个镜像。
- 任何一个可以从Y获取的构件,都可以从它的镜像中获取。
- 可以采用镜像的方式配置远程仓库,镜像在settings.xml中进行配置,对所有使用该配置的maven项目起效。
配置镜像仓库
    <mirrors>
        <mirror>
            <id>meituan-dianping</id>
            <name>meituan-dianping mirror</name>
            <url>http://pixel.sankuai.com/repository/mtdp</url>
            <mirrorOf>*</mirrorOf>
        </mirror>
    </mirrors>
1
2
3
4
5
6
7
8配置解释
- mirrors元素下包含多个mirror子元素,每个mirror元素表示一个远程镜像。
- id:镜像id,唯一标识。
- name:镜像名称。
- url:镜像地址
- mirrorOf:指定哪些远程仓库的id使用这个镜像去下载构件,这个对应pom.xml文件中repository元素的id。就是表示这个镜像是给哪些pom.xml文件中的远程仓库使用的,这里面需要列出远程仓库的id,多个之间用逗号隔开。
- mirrorOf配置语法:
* :匹配所有远程仓库。external: * :匹配所有不在本机上的远程仓库。repo1, repo2 :匹配仓库repo1和repo2,多个仓库之间使用逗号分割。*, !repo1 :匹配所有远程仓库,除了仓库repo1,使用感叹号(!)将仓库从匹配中排除。
注意 镜像仓库完全屏蔽了被镜像仓库,当镜像仓库不稳定或者停止服务的时候,maven无法自动切换到被镜像仓库,因此将会无法下载构件。
结合私服使用 由于私服可以代理所有远程仓库(包含中央仓库),因此对于组织内部的maven用户来说,使用一个私服地址就等于使用了所有需要的外部仓库。
# 四、仓库布局
仓库布局方式 任何一个构件都有其唯一的坐标,根据坐标可以定义其在仓库中的唯一路径。
举例
以spring-web的依赖为例
项目demo1 pom文件的依赖
org.springframework spring-web 5.2.1.RELEASE 查看spring-web的jar包在本地仓库中的位置。
- /Users/xuyang/.m2/repository/org/springframework/spring-web/5.2.1.RELEASE/spring-web-5.2.1.RELEASE.jar
- /Users/xuyang/.m2/repository是本地仓库目录。
- 构件的目录路径为groupId/artifactId/version/
- 构件名称为:artifactId-version[-classifier].packaging, packaging默认为jar。
maven如何定位构件路径
- 将groupId中的句点分隔符(.)转换成路径分隔符(/),同时在后面追加一个路径分隔符(/)。
- org.springframework--->org/springframework/
- 将artifactId拼接在1的路径上, 同时在后面追加一个路径分隔符(/)。
- org/springframework/spring-web/
- 将version拼接在2的路径上,同时在后面追加一个路径分隔符(/)。
- org/springframework/spring-web/5.2.1.RELEASE/
- 将构件名称拼接在3的路径上。
- org/springframework/spring-web/5.2.1.RELEASE/spring-web-5.2.1.RELEASE.jar
- 将groupId中的句点分隔符(.)转换成路径分隔符(/),同时在后面追加一个路径分隔符(/)。
# 五、仓库如何解析依赖
- 当本地仓库没有依赖构件的时候,maven会自动从远程仓库下载;
- 当依赖版本为快照版本的时候,maven会自动找到最新的快照。
- 依赖解析机制:
- 依赖范围是system的时候,maven直接从本地文件系统解析构件。
- 根据依赖坐标计算仓库路径后,尝试直接从本地仓库寻找构件,如发现相应构件,则解析成功。
- 如果本地仓库构件不存在,并且依赖的版本是显示的发布版本构件,则遍历所有的远程仓库,发现后 下载并解析使用。
# 六、仓库检索
- Sonatype(中央仓库):https://search.maven.org/ (opens new window)
- Sonatype Nexus: https://repository.sonatype.org/ (opens new window)
- MVNRepository:https://mvnrepository.com/ (opens new window)
# 4. 私服
# 一、私服
公司私服为自研,详情需查看官方文档:Pixel PRFAQ v1 (opens new window)
# 二、使用
# 1.安装和配置
- 安装Maven工具,配置环境变量及本地仓库(自行Google一下)
- 使用公司统一的settings.xml文件替换本地的settings.xml文件(一般是在.m2目录下),如果本部门或者bg/bu有特殊需求,比如到家等,请使用本部门自己的settings.xml文件(// TODO 总结一下内部在用的)
- 公司统一的settings.xml文件:统一的settings.xml文件 (opens new window)
- 到家事业部等需要使用线下仓库隔离(其它部门不要使用)的:线下 Maven Settings.xml (opens new window)
- (可选)idea请做如下配置,选择.m2文件下的settings.xml文件和本地仓库目录,并在后面勾选上覆盖
# 2.上传(deploy)配置
- Plus上配置Maven发布项
链接:1. Quick Start (New) (opens new window)
链接(仅到家或其它使用offline仓库的部门使用):6. Maven部署线下仓库 (opens new window)
- Plus上Maven发布项相关配置说明
链接:3. Maven 参数 (opens new window)
- 个人本地deploy配置
目前在逐步封禁本地deploy限制推进 (opens new window),请使用Plus进行发包
# 5. 生命周期和插件
# 一、maven的生命周期
# 1.生命周期介绍
- maven的生命周期就是为了对所有的构建过程进行抽象和统一。
- 包含了项目的清理、初始化、编译、测试、打包、集成测试、验证、部署和站点生成等几乎所有构建步骤。
- 几乎所有的项目构建,都能映射到这样一个生命周期上。
# 2.生命周期详解
# 2.1.三套生命周期
- maven包含三套相互独立的生命周期。
- clean生命周期:用于清理项目。
- default生命周期:用于构建项目。
- site生命周期:用于建立项目站点。
# 2.2.生命周期内部的阶段
- 每个生命周期包含多个阶段(phase)。
- 这些阶段是有序的。
- 后面的阶段依赖于前面的阶段。当执行某个阶段的时候,会先执行它前面的阶段。
- 用户和maven最直接的交互就是调用这些生命周期阶段。
# 2.3.clean生命周期
clean生命周期的目的是清理项目,它包含3个阶段:
| clean生命周期阶段 | 说明 |
|---|---|
| pre-clean | 执行一些clean前需要完成的工作 |
| clean | 清理上一次构建生成的文件 |
| post-clean | 执行一些clean后需要完成的工作 |
# 2.4.default生命周期
default生命周期的目的是构建项目,它定义了真正构建时所需要完成的所有步骤,是所有生命周期中最核心的部分。 包含23个阶段:详细介绍 (opens new window)
| default生命周期阶段 | 说明 |
|---|---|
| validate | 验证项目是否正确并且所有必要信息都可用 |
| initialize | 初始化构建状态,比如设置属性值、创建目录 |
| generate-sources | 生成包含在编译阶段中的任何源代码 |
| process-sources | 处理源代码,比如说,过滤任意值 |
| generate-resources | 生成将会包含在项目包中的资源文件 |
| process-resources | 复制和处理资源到目标目录,为打包阶段最好准备 |
| compile | 编译项目的源代码 |
| process-classes | 处理编译生成的文件,比如说对Java class文件做字节码改善优化 |
| generate-test-sources | 生成包含在编译阶段中的任何测试源代码 |
| process-test-sources | 处理测试源代码,比如说,过滤任意值 |
| generate-test-resources | 为测试创建资源文件 |
| process-test-resources | 复制和处理测试资源到目标目录 |
| test-compile | 编译测试源代码到测试目标目录 |
| process-test-classes | 处理测试源码编译生成的文件 |
| test | 使用合适的单元测试框架运行测试 , 测试代码不会被打包或部署 |
| prepare-package | 在实际打包之前,执行任何的必要的操作为打包做准备 |
| package | 将编译后的代码打包成可分发的格式,比如JAR |
| pre-integration-test | 在执行集成测试前进行必要的动作。比如说,搭建需要的环境 |
| integration-test | 如有必要,将程序包处理并部署到可以运行集成测试的环境中 |
| post-integration-test | 执行集成测试完成后进行必要的动作。比如说,清理集成测试环境 |
| verify | 运行任何检查以验证包是否有效并符合质量标准 |
| install | 安装项目包到maven本地仓库,供本地其他maven项目使用 |
| deploy | 将最终包复制到远程仓库,供其他开发人员和maven项目使用 |
# 2.5.site生命周期
site生命周期的目的是建立和发布项目站点。 Maven能够基于pom.xml所包含的信息,自动生成一个友好的站点,方便团队交流和发布项目信息。 包含以下4个阶段:
| site生命周期阶段 | 说明 |
|---|---|
| pre-site | 执行一些在生成项目站点之前需要完成的工作 |
| site | 生成项目站点文档 |
| post-site | 执行一些在生成项目站点之后需要完成的工作 |
| site-deploy | 将生成的项目站点发布到服务器上 |
# 2.6.mvn命令和生命周期
从命令行执行maven任务的最主要方式就是调用maven的生命周期阶段。 需要注意的是,每套生命周期是相互独立的,但是每套生命周期的阶段是有前后依赖关系的。
- 格式: mvn 阶段 [阶段2] ...[阶段n]
- mvn clean:该命令调用clean生命周期的clean阶段。
- 实际执行的阶段为clean生命周期中的pre-clean和clean阶段。
- mvn test:该命令调用default生命周期的test阶段。
- 实际执行的阶段为default生命周期的从validate到test的所有阶段。
- 这也就解释了为什么执行测试的时候,项目的代码能够自动编译。
- mvn clean install:该命令调用clean生命周期的clean阶段和default生命周期的install阶段。
- 实际执行的阶段为clean生命周期的pre-clean、clean阶段,以及default生命周期的从validate到install的所有阶段。
- mvn clean deploy:该命令调用clean生命周期的clean阶段和default生命周期的deploy阶段。
- 实际执行的阶段为clean生命周期的pre-clean、clean阶段,以及default生命周期的所有阶段。
- 包含了清理上次构建的结果、编译代码、运行单元测试、打包、将打好的包安装到本地仓库、将打好的包发布到远程仓库等所有操作。
# 二、maven插件
# 1.插件目标
- maven的核心仅仅定义了抽象的生命周期,具体的任务交给插件完成。
- 每套生命周期包含多个阶段,每个阶段执行什么操作,都由插件完成。
- 插件以独立的构件形式存在。
- 为了能够复用代码,每个插件包含多个功能。
- 插件中的每个功能就叫做插件的目标(Plugin Goal),每个插件中可能包含一个或者多个插件目标(Plugin Goal)。
# 2.插件绑定
- maven生命周期的阶段与插件目标绑定,以完成某个具体的构件任务。
- 比如项目编译这个任务,对应了default生命周期阶段的compile阶段,而maven-compiler-plugin插件的compile目标能够完成该任务,因此将他们进行绑定,实现项目编译任务。
- 生命周期阶段与插件进行绑定后,可以通过mvn 阶段来执行和这个阶段绑定的插件目标。
# 3.内置绑定
# 3.1.说明
为了让用户几乎不用任何配置就能构建maven项目,maven为一些主要的生命周期阶段绑定好了插件目标,当我们通过命令调用生命周期阶段时,绑定的插件目标就会执行对应的任务
# 3.2.clean生命周期阶段与插件目标的绑定关系
| 生命周期阶段 | 插件目标 | 作用 |
|---|---|---|
| pre-clean | ||
| clean | maven-clean-plugin:clean | 删除项目的输出目录 |
| post-clean |
# 3.3.default生命周期阶段与插件目标的绑定关系(打包类型:jar)
| 生命周期阶段 | 插件目标 | 作用 |
|---|---|---|
| process-resources | maven-resources-plugin:resources | 复制主资源文件到主输出目录 |
| compile | maven-compiler-plugin:compile | 编译主代码到主输出目录 |
| process-test-resources | maven-resources-plugin:testResources | 复制测试资源文件到测试输出目录 |
| test-compile | maven-compiler-plugin:testCompile | 编译测试代码到测试输出目录 |
| test | maven-surefire-plugin:test | 执行测试用例 |
| package | maven-jar-plugin:jar | 创建项目jar包 |
| install | maven-install-plugin:install | 将项目输出构件安装到本地maven仓库 |
| deploy | maven-deploy-plugin:deploy | 将项目输出构件部署到远程仓库 |
# 3.4.site生命周期阶段与插件目标的绑定关系
| 生命周期阶段 | 插件目标 | 作用 |
|---|---|---|
| pre-site | ||
| site | maven-site-plugin:site | 生成项目站点 |
| post-site | ||
| site-deploy | maven-site-plugin:deploy | 将项目站点部署到远程服务器 |
# 3.5.构建过程验证
与1.2生命周期详解中6.mvn命令和生命周期示例相同,项目依然使用mavenTest1作为示例。
mvn clean:
[INFO] Scanning for projects...
[INFO]
[INFO] -----------------------< com.sankuai:mavenTest1 >-----------------------
[INFO] Building mavenTest1 1.0-SNAPSHOT
[INFO] --------------------------------[ jar ]---------------------------------
[INFO]
[INFO] --- maven-clean-plugin:2.5:clean (default-clean) @ mavenTest1 ---
[INFO] Deleting /Users/xuyang/workspace/mavenTest1/target
[INFO] ------------------------------------------------------------------------
[INFO] BUILD SUCCESS
[INFO] ------------------------------------------------------------------------
[INFO] Total time:  0.276 s
[INFO] Finished at: 2022-01-12T19:34:03+08:00
[INFO] ------------------------------------------------------------------------
1
2
3
4
5
6
7
8
9
10
11
12
13
14mvn test:
- 调用default生命周期的test阶段,实际执行的时候 default生命周期的validate阶段直到test阶段都要执行,每个阶段绑定的插件目标也会被执行。可以看到处理资源、编译源码、处理测试资源、编译测试源码、测试插件目标都得到了执行。
[INFO] Scanning for projects...
[INFO]
[INFO] -----------------------< com.sankuai:mavenTest1 >-----------------------
[INFO] Building mavenTest1 1.0-SNAPSHOT
[INFO] --------------------------------[ jar ]---------------------------------
[INFO]
[INFO] --- maven-resources-plugin:2.6:resources (default-resources) @ mavenTest1 ---
[INFO] Using 'UTF-8' encoding to copy filtered resources.
[INFO] skip non existing resourceDirectory /Users/xuyang/workspace/mavenTest1/src/main/resources
[INFO]
[INFO] --- maven-compiler-plugin:3.1:compile (default-compile) @ mavenTest1 ---
[INFO] Nothing to compile - all classes are up to date
[INFO]
[INFO] --- maven-resources-plugin:2.6:testResources (default-testResources) @ mavenTest1 ---
[INFO] Using 'UTF-8' encoding to copy filtered resources.
[INFO] skip non existing resourceDirectory /Users/xuyang/workspace/mavenTest1/src/test/resources
[INFO]
[INFO] --- maven-compiler-plugin:3.1:testCompile (default-testCompile) @ mavenTest1 ---
[INFO] Changes detected - recompiling the module!
[INFO] Compiling 1 source file to /Users/xuyang/workspace/mavenTest1/target/test-classes
[INFO]
[INFO] --- maven-surefire-plugin:2.12.4:test (default-test) @ mavenTest1 ---
[INFO] Surefire report directory: /Users/xuyang/workspace/mavenTest1/target/surefire-reports

-------------------------------------------------------
 T E S T S
-------------------------------------------------------
Running com.sankuai.AppTest
Tests run: 1, Failures: 0, Errors: 0, Skipped: 0, Time elapsed: 0.006 sec

Results :

Tests run: 1, Failures: 0, Errors: 0, Skipped: 0

[INFO] ------------------------------------------------------------------------
[INFO] BUILD SUCCESS
[INFO] ------------------------------------------------------------------------
[INFO] Total time:  2.026 s
[INFO] Finished at: 2022-01-12T19:34:57+08:00
[INFO] ------------------------------------------------------------------------
1
2
3
4
5
6
7
8
9
10
11
12
13
14
15
16
17
18
19
20
21
22
23
24
25
26
27
28
29
30
31
32
33
34
35
36
37
38
39
40mvn clean install:
- 该命令调用clean生命周期的clean阶段和default生命周期的install阶段。
- (构建过程内容省略)
mvn clean deploy:
- 该命令调用clean生命周期的clean阶段和default生命周期的deploy阶段。
- (构建过程内容省略)
# 4.插件配置
# 4.1.命令行插件配置
- 在maven命令中使用-D参数,并伴随一个参数键=参数值的形式,来配置插件目标的参数。
- 参数-D是java自带的,其功能是通过命令行设置一个java系统属性。
- 例如,跳过执行测试目标,mvn clean pakcage -Dmaven.test.skip=true
# 4.2.pom文件中插件全局配置
用户在pom文件声明插件时,可以对插件进行全局的配置。
例如,配置maven-compiler-plugin编译Java 1.8版本的源文件,生成与JVM 1.8兼容的字节码文件。
<build>
    <plugins>
        <plugin>
            <groupId>org.apache.maven.plugins</groupId>
            <artifactId>maven-compiler-plugin</artifactId>
            <version>3.8.1</version>
            <configuration>
                <!-- 编译器版本 -->
                <compilerVersion>1.8</compilerVersion>
                <!-- 源码版本 -->
                <source>1.8</source>
                <!-- 目标代码版本 -->
                <target>1.8</target>
            </configuration>
        </plugin>
    </plugins>
</build>
1
2
3
4
5
6
7
8
9
10
11
12
13
14
15
16
17
# 5.获取插件信息
# 5.1.在线插件信息
- Apache:Maven Plugins (opens new window)
- 可以查看插件介绍、插件目标、目标参数等等。
# 5.2.使用 maven-help-plugin 描述插件
使用 maven-help-plugin 获取插件信息。
方式1:使用插件坐标:mvn help:describe -Dplugin=groupId:artifactId:version
方式2:使用插件目标前缀:mvn help:describe -Dplugin=Goal Prefix,目标前缀的作用是方便在命令行直接运行插件。
如果要获取插件的详细描述,可以在命令后加上-Ddetail参数。
举例:两种方式获取maven-compiler-plugin:3.8.1的插件描述信息
mvn help:describe -Dplugin=org.apache.maven.plugins:maven-compiler-plugin:3.8.1
mvn help:describe -Dplugin=compiler
过程输出
[INFO] org.apache.maven.plugins:maven-compiler-plugin:3.2

Name: Apache Maven Compiler Plugin
Description: The Compiler Plugin is used to compile the sources of your
  project.
Group Id: org.apache.maven.plugins
Artifact Id: maven-compiler-plugin
Version: 3.2
Goal Prefix: compiler

This plugin has 3 goals:

compiler:compile
  Description: Compiles application sources

compiler:help
  Description: Display help information on maven-compiler-plugin.
    Call mvn compiler:help -Ddetail=true -Dgoal=<goal-name> to display
    parameter details.

compiler:testCompile
  Description: Compiles application test sources.

For more information, run 'mvn help:describe [...] -Ddetail'

[INFO] ------------------------------------------------------------------------
[INFO] BUILD SUCCESS
[INFO] ------------------------------------------------------------------------
[INFO] Total time:  1.950 s
[INFO] Finished at: 2022-01-12T19:39:20+08:00
[INFO] ------------------------------------------------------------------------
1
2
3
4
5
6
7
8
9
10
11
12
13
14
15
16
17
18
19
20
21
22
23
24
25
26
27
28
29
30
31
# 5.3.从命令行调用插件
- maven命令帮助:mvn -h
- 输出:usage: mvn [options] [<goal(s)>] [<phase(s)>]
- 获取项目依赖树:mvn dependency:tree
- 分析当前项目依赖:mvn dependency:analyze
- 查看当前项目的已解析依赖:mvn dependency:list
- 查看项目最终pom.xml文件:mvn help:effective-pom
# 6.插件解析
maven简化了插件的使用和配置,但是具体maven是怎么解析插件的呢?
# 6.1.插件仓库
与依赖构件一样,插件构件同样基于坐标存储在maven仓库中。在需要的时候,maven会从本地仓库查找插件,如果不存在,则从远程仓库查找。找到后下载到本地仓库使用。
配置插件仓库,插件仓库与依赖构件仓库是分开配置的。
在项目pom文件pluginRepositories -> pluginRepository元素中配置插件仓库。
具体配置(maven 内置的插件远程仓库):
<pluginRepositories>
  <pluginRepository>
    <id>central</id>
    <name>Central Repository</name>
    <url>https://repo.maven.apache.org/maven2</url>
    <layout>default</layout>
    <snapshots>
      <enabled>false</enabled>
    </snapshots>
    <releases>
      <updatePolicy>never</updatePolicy>
    </releases>
  </pluginRepository>
</pluginRepositories>
1
2
3
4
5
6
7
8
9
10
11
12
13
14
# 6.2.插件的默认groupId
- org.apache.maven.plugins,配置时不建议省略。
# 6.3.解析插件版本
- maven在超级pom中为所有核心插件定义了版本。
- 使用插件时候,应该一直显式设定版本。
# 6.4.解析插件前缀
插件前缀(Goal Prefix)与groupId:artifactId是一一对应的,这种对应关系存储在仓库元数据中。
本地仓库插件元数据文件位置:~/.m2/repository/org/apache/maven/plugins/maven-metadata-central.xml
<metadata>
    <plugins>
        <plugin>
            <name>Apache Maven Clean Plugin</name>
            <prefix>clean</prefix>
            <artifactId>maven-clean-plugin</artifactId>
        </plugin>
        <plugin>
            <name>Apache Maven Compiler Plugin</name>
            <prefix>compiler</prefix>
            <artifactId>maven-compiler-plugin</artifactId>
        </plugin>
    </plugins>
</metadata>
1
2
3
4
5
6
7
8
9
10
11
12
13
14
默认的插件仓库groupId:org.apache.maven.plugins
配置自己的插件仓库元数据:
用户的maven配置文件:~/.m2/settings.xml
settings -> pluginGroups -> pluginGroup元素中配置。
<settings>
  <pluginGroups>
    <pluginGroup>com.your.plugins</pluginGroup>
  </pluginGroups>
</settings>
1
2
3
4
5
# 6. 多执行环境
# 一、灵活构建
# 1.三大特性
- 属性
- 资源过滤
- Profile
# 2.属性
# 2.1.自定义属性
用户可以在项目的pom文件的
元素中自定义maven属性。 在pom文件的其他地方,使用${属性名称}引用该属性。
意义在于消除重复,示例代码如下。
<project>
    <properties>
        <springframework.groupId>org.springframework</springframework.groupId>
        <springframework.version>5.2.1.RELEASE</springframework.version>
    </properties>
    <dependencies>
        <dependency>
            <groupId>${springframework.groupId}</groupId>
            <artifactId>spring-web</artifactId>
            <version>${springframework.version}</version>
        </dependency>
        <dependency>
            <groupId>${springframework.groupId}</groupId>
            <artifactId>spring-aop</artifactId>
            <version>${springframework.version}</version>
        </dependency>
    </dependencies>
</project>
1
2
3
4
5
6
7
8
9
10
11
12
13
14
15
16
17
18
# 2.2.内置属性
两个常用的内置属性:
- ${basedir}: 项目根目录,即包含pom文件的目录
- ${version}: 项目版本
# 2.3.POM属性
用户可以使用该类属性引用pom文件中对应元素的值。 常用的pom属性如下:
- ${project.build.sourceDirectory}: 项目的主源码目录,默认为src/main/java/
- ${project.build.testSourceDirectory}:项目的测试源码目录,默认为src/test/java/
- ${project.build.directory}:项目的构建输出目录,默认为target/
- ${project.outputDirectory}: 项目的主代码编译输出目录,默认为target/classes/
- ${project.testOutputDirectory}: 项目的测试代码编译输出目录,默认为target/test-classes/
- ${project.groupId}: 项目的groupId
- ${project.artifactId}: 项目的artifactId
- ${project.version}: 项目的版本,与${version}等价。
- ${project.build.finalName}: 项目打包输出文件的名称。默认为${project.artifactId}-${project.version}
# 2.4.settings属性
用户可以使用该类属性引用settings文件中对应元素的值。
- ${settings.localRepository}:用户本地仓库
# 2.5.Java系统属性
- 所有Java系统属性都可以使用Maven属性引用。
- 使用mvn help:system查看所有的Java系统属性。
- ${user.home}:用户目录
# 2.6.环境变量属性
- 所有环境变量都可以使用env.开头的Maven属性引用。
- 使用mvn help:system查看所有的环境变量属性。
- ${env.JAVA_HOME}: JAVA_HOME环境变量的值。
# 3.资源过滤
# 3.1.遇到的问题
- 多环境配置:项目不同的环境对应着不同的数据库配置,手动更改这些配置往往比较低效。
# 3.2.解决
- 使用maven属性将这些会发生变化的部分提取出来。
- 然后开启资源目录的过滤功能,就可以解决这一问题。
# 3.3.示例
数据库配置
# src/main/resources/application.properties
database.jdbc.driverClass=${db.driver}
database.jdbc.connectionUrl=${db.url}
database.jdbc.username=${db.user}
database.jdbc.password=${db.pw}
1
2
3
4开启资源过滤
<project>
    <properties>
        <db.driver>com.mysql.jdbc.Driver</db.driver>
        <db.url>jdbc:mysql//localhost:3306/test</db.url>
        <db.user>dev-user</db.user>
        <db.pw>dev-pwd</db.pw>
    </properties>

    <build>
        <resources>
            <resource>
                <directory>${project.basedir}/src/main/resources</directory>
                <filtering>true</filtering>
            </resource>
        </resources>
    </build>
</project>
1
2
3
4
5
6
7
8
9
10
11
12
13
14
15
16
17编译代码mvn compile
- 查看主代码编译输出目录下的资源文件,已经得到了替换。
database.jdbc.driverClass=com.mysql.jdbc.Driver
database.jdbc.connectionUrl=jdbc:mysql//localhost:3306/test
database.jdbc.username=aaa
database.jdbc.password=aaa-pwd
1
2
3
4
# 4.Maven Profile
# 4.1.针对不同环境的profile
示例:基于开发和测试环境的profile
    <project>
    <profiles>
        <profile>
            <id>dev</id>
            <properties>
                <db.driver>com.mysql.jdbc.Driver</db.driver>
                <db.url>jdbc:mysql//localhost:3306/test</db.url>
                <db.user>dev</db.user>
                <db.pw>dev-pwd</db.pw>
            </properties>
        </profile>

        <profile>
            <id>test</id>
            <properties>
                <db.driver>com.mysql.jdbc.Driver</db.driver>
                <db.url>jdbc:mysql//localhost:3306/test</db.url>
                <db.user>test</db.user>
                <db.pw>test-pwd</db.pw>
            </properties>
        </profile>
    </profiles>
</project>
1
2
3
4
5
6
7
8
9
10
11
12
13
14
15
16
17
18
19
20
21
22
23
# 4.2.激活profile
命令行激活
- 使用maven命令行参数 -P 加上profile的 id ,多个id之间逗号分隔
- 如:mvn clean compile -Pdev
默认激活
配置profile > activation > activationByDefault元素的值为true,该profile默认激活
<project>
    <profiles>
        <profile>
            <id>dev</id>
            <activation>
                <activeByDefault>true</activeByDefault>
            </activation>
            <properties>
                <db.driver>com.mysql.jdbc.Driver</db.driver>
                <db.url>jdbc:mysql//localhost:3306/test</db.url>
                <db.user>dev</db.user>
                <db.pw>dev-pwd</db.pw>
            </properties>
        </profile>
    </profiles>
</project>
1
2
3
4
5
6
7
8
9
10
11
12
13
14
15
16
系统属性激活
mvn ... -D属性xx=属性xx的值
指定的属性存在,激活profile
指定的属性存在,并且值等于x时,激活profile
<project>
    <profiles>
        <profile>
            <id>dev</id>
            <activation>
                <property>
                    <name>test</name>
                    <value>x</value>
                </property>
            </activation>
            <properties>
                <db.driver>com.mysql.jdbc.Driver</db.driver>
                <db.url>jdbc:mysql//localhost:3306/test</db.url>
                <db.user>dev</db.user>
                <db.pw>dev-pwd</db.pw>
            </properties>
        </profile>
    </profiles>
</project>
1
2
3
4
5
6
7
8
9
10
11
12
13
14
15
16
17
18
19
文件存在与否激活
<project>
    <profiles>
        <profile>
            <id>dev</id>
            <activation>
                <file>
                    <exists>x.properties</exists>
                    <missing>y.properties</missing>
                </file>
            </activation>
            <properties>
                <db.driver>com.mysql.jdbc.Driver</db.driver>
                <db.url>jdbc:mysql//localhost:3306/test</db.url>
                <db.user>dev</db.user>
                <db.pw>dev-pwd</db.pw>
            </properties>
        </profile>
    </profiles>
</project>
1
2
3
4
5
6
7
8
9
10
11
12
13
14
15
16
17
18
19
# 4.3.查看当前激活的profile
- mvn help:active-profiles
# 4.4.列出所有的profile
- mvn help:all-profiles
# 7. 项目多模块 一、Maven聚合
# 1.为什么使用聚合?
假设一个项目包含两个模块,我们想要一次构建两个模块,而不是到两个模块的目录下分别执行mvn命令,这时就需要用到聚合。
# 2.聚合配置
# 2.1.聚合模块pom配置
聚合模块packaging类型为 pom
聚合模块包含 modules元素,每个module对应一个要被聚合的子模块。
module的值是当前pom的相对目录。
具体配置
<modules>
    <module>模块1</module>
    <module>模块2</module>
    <module>模块3</module>
</modules>
1
2
3
4
5
# 2.2.聚合模块相对位置
- 通常将聚合模块放在项目目录的最顶层,其他模块作为聚合模块的子目录。
# 2.3.聚合模块意义
- 聚合模块仅仅是帮助聚合其他模块构建的工具,本身并无实质内容。
- 解决同时构建多个模块的问题。
# 2.4.聚合模块构建
- maven首先会解析聚合模块的pom,分析要构建的模块,并计算出一个反应堆构建顺序(Reactor Build Order),然后根据这个顺序依次构建各个模块。
# 二、Maven继承
# 1.为什么使用继承?
解决重复配置问题。
# 2.继承配置
# 2.1.项目继承的配置
父模块的packaging类型为pom。
子模块需要配置project -> parent元素信息
- 父模块坐标配置,groupId:artifactId:version
- relativePath: 父模块pom文件所在路径,默认父pom在上一层目录下(即 ../pom.xml)。
- 构建过程中,maven会根据relativePath检查父pom,如果找不到,再从本地仓库查找。
子模块继承父模块的配置
<parent>
    <groupId>父构件groupId</groupId>
    <artifactId>父构件artifactId</artifactId>
    <version>父构件的版本号</version>
    <relativePath>父构件pom.xml路径</relativePath>
</parent>
1
2
3
4
5
6
# 2.2.可继承的pom元素
- groupId:项目组ID,项目坐标的核心元素。
- version:项目版本,项目坐标的核心元素。
- description:项目的描述信息。
- organization:项目的组织信息。
- inceptionYear:项目的创始年份。
- url:项目的url地址。
- developers:项目的开发者信息。
- contributors:项目的贡献者信息。
- distributionManagement:项目的部署配置信息。
- issueManagement:项目的缺陷跟踪系统信息。
- ciManagement:项目的持续集成系统信息。
- scm:项目的版本控制系统信息。
- mailingLists:项目的邮件列表信息。
- properties:自定义的maven属性配置信息。
- dependencyManagement:项目的依赖管理配置。
- repositories:项目的仓库配置。
- build:包括项目的源码目录配置、输出目录配置、插件配置、插件管理配置等信息。
- reporting:包括项目的报告输出目录配置、报告插件配置等信息。
# 2.3.依赖管理
maven提供的dependencyManagement元素既能让子模块继承到父模块的依赖配置,又能保证子模块依赖使用的灵活性.
在dependencyManagement元素下的依赖声明不会引入实际的依赖,但是它能约束对dependencies下的依赖使用。
import依赖范围:
将目标pom中dependencyManagement配置导入,并合并到当前项目的dependencyManagement元素中。
不想使用继承的方式,来达到使用目标pom中的依赖的目的。
import依赖范围一般都指向打包类型为pom的模块。
<dependencyManagement>
    <dependencies>
        <dependency>
            <groupId>targetGroupId</groupId>
            <artifactId>targetArtifactId</artifactId>
            <version>targetVersion</version>
            <type>pom</type>
            <scope>import</scope>
        </dependency>
        <dependency>构件1</dependency>
        <dependency>构件2</dependency>
    </dependencies>
</dependencyManagement>
1
2
3
4
5
6
7
8
9
10
11
12
13
# 2.4.插件管理
maven中提供了dependencyManagement来帮助管理依赖继承,也提供了pluginManagement元素帮助管理插件继承。
在父模块pom中该元素的配置不会造成实际的插件调用行为,只有在子pom.xml中配置plugins -> plugin元素声明该插件的时候,插件才会起效。
子pom插件中只需要写groupId、artifactId,其他信息都可以从父pom中传递过来。
举例,使用maven-source-plugin插件生成项目源码包,将该插件的jar-no-fork目标绑定到default生命周期的verify阶段。
父pom插件管理配置
<build>
    <pluginManagement>
        <plugins>
            <plugin>
                <groupId>org.apache.maven.plugins</groupId>
                <artifactId>maven-source-plugin</artifactId>
                <version>3.2.1</version>
                <executions>
                    <execution>
                        <id>attach-source</id>
                        <phase>verify</phase>
                        <goals>
                            <goal>jar-no-fork</goal>
                        </goals>
                    </execution>
                </executions>
            </plugin>
        </plugins>
    </pluginManagement>
</build>
1
2
3
4
5
6
7
8
9
10
11
12
13
14
15
16
17
18
19
20子pom插件声明配置
<build>
    <plugins>
        <plugin>
            <groupId>org.apache.maven.plugins</groupId>
            <artifactId>maven-source-plugin</artifactId>
        </plugin>
    </plugins>
</build>
1
2
3
4
5
6
7
8
# 三、聚合与继承
# 1.目的
- 聚合主要是为了方便快速构建多模块项目。
- 继承主要是为了消除重复配置。
# 2.与其他模块关系
- 对于聚合模块来说,聚合模块知道有哪些被聚合的模块,而被聚合模块不知道聚合模块的存在。
- 对于继承来说,父模块是不知道有哪些子模块继承它,而子模块需要使用parent来引用父模块。
# 3.共同点
- 聚合模块和继承中的父模块的packaging属性都必须是pom类型的。
- 同时,聚合模块和父模块除了pom.xml,一般都没有实际内容。
# 4.实际使用
- 将聚合和继承一起使用,能同时使用到两者的优点。
# 四、反应堆
# 1.介绍
# 1.1.反应堆
- 在多模块的maven项目中,反应堆(Reactor)是指所有模块组成的一个构建结构。
# 1.2.单模块项目的反应堆
- 就是该模块本身。
# 1.3.多模块项目的反应堆
- 包含模块之间继承与依赖的关系,从而能够自动计算出合理的模块构建顺序。
# 2.反应堆构建顺序
- maven按聚合配置中的顺序读取pom。
- 如果该pom没有依赖模块,那么就构建该模块,否则就先构建其依赖的模块,如果该依赖还依赖于其他模块,则进一步先构建依赖的依赖。
# 3.裁剪反应堆
# 3.1.说明
- 一般情况下,用户会选择构建整个项目或者选择构建单个模块。
- 如果想要仅仅构建完整反应堆中的某些模块,就需要实时的裁剪反应堆
# 3.2.裁剪反应堆选项
- 执行mvn -h可以看到裁剪反应堆的选项。
- -am:--also-make, 同时构建所列模块的依赖模块。
- -amd:-also-make-dependencies,同时构建依赖于所列模块的模块。
- -pl:--projects
,构建指定的模块,模块之间使用逗号分隔 - -rf:-resume-from
,从指定的模块继续反应堆